Hello, and welcome back to another Dev Diary from the frozen wasteland that is Sweden in January. Today, we will have another short AAR of a naval warfare scenario, similar to the one we did earlier about raiding and submarine warfare.
This was played as an MP game between me and Niall (@Ceebie), with me defending the Empire of Japan’s honor against Niall’s filthy American imperialists.
Starting as Japan, I immediately face a number of issues that should sound very familiar: I have very limited resources, particularly in terms of oil. This is now a much bigger issue as I can still happily build ships and airplanes and tanks, but I won’t be able to run them for free. However, if I want to upgrade my ships (and knowing Niall, I absolutely do), I will need naval experience, and China is unlikely to provide me with a lot of it. So I need to run training missions for my fleet, which gobbles up fuel at a rapid pace (I could only take out my main fleet units for a few brief weeks before the fuel situation became critical).
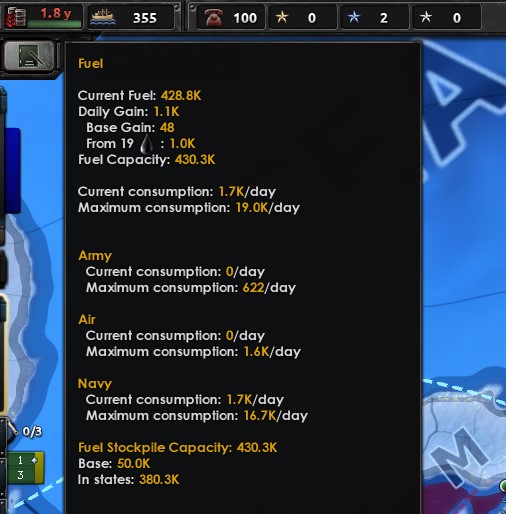
At the same time, while I could trade for more oil, it will cost civilian factories which I desperately need to build up my own industry or to trade for steel to continue my military buildup. I decided to keep the trading for oil to a minimum in order to more quickly build up my industry and increase the size of my fleet.

My first target is, of course, China, and we start the war with them in the middle of 1937. It quickly becomes apparent that I underestimate the Chinese. Fighting rages hard along the border for several weeks, and a number of naval landings that attempt to force the AI to draw troops away from the main front are quickly contained by local garrisons, but at least not pushed back into the sea. Part of the problem is that the fleets tasked with invasion support contain some of my battleships, which eat up absurd amounts of fuel, and my attempts to turn the tide through prolific use of air support eat into my fuel supplies even more.
By early 1938, we are slowly grinding forward and have managed to inflict serious casualties on the Chinese, but my fuel stockpile has shrunken to just 30 days of current use. I curtail air support to only support my main thrust and send the naval forces providing shore bombardment back to port. Progress slows, but eventually we link up with the landing forces, at least saving me from an embarrassing early defeat. The massive amounts of Land XP also allow me to run through the doctrine tree quite a bit faster than Niall could ever hope to. Sadly the war in the Pacific will not be fought on land.

It would take until early 1941 for the Chinese to fall, even though the writing is on the wall by the middle of 1940. I blame the poor infrastructure and awful terrain in China - my leadership is, after all, beyond any reasonable doubt.
In the meantime, Niall has been quietly modernizing his fleet and has started his rearmament. While a good amount of his effort is spent on helping out the British in Europe, I have no doubt that he has something in store for me. While I was deeply engaged in managing the war in China, I received some out-of-game intelligence (Niall bragging in the kitchen that his destroyer swarms would annihilate me) that makes me realize that my fleet lacks some key capabilities. The starting Japanese light cruisers are fairly mediocre, most have been built during the 20ies and are not up to the task of winning a firefight against the likes of a Brooklyn Class cruiser with no less than 3 light cruiser battery modules. What I do have is a lot of torpedoes, and I invest a little into researching upgraded torpedoes and better launchers. The Japanese Long Lance national spirit gives me another perk, as it negates the enemy screening to an extend, which means that my torpedoes can hit his capitals even through 100% screening.

So while I was slowly grinding my way across China, I also decided on my buildup strategy:

The fleet’s main objective, however, is to provide support for landings to seize resource rich areas in the Dutch East Indies. To protect the sea lanes to and from these islands, I will need to secure the Philippines, and that is where things get a little dicey.
While I have little doubt that my forces can take over Sumatra, Java and Borneo, Malaya might be a tough nut to crack, and I know that Niall has already started to fortify the Philippines. I have researched amphibious armor well in advance and with China now pacified, I start to turn up production in an attempt to give my marines a bit more punch and hopefully allow me to seize a foothold even against heavy opposition.

Thinking ahead, I also research improved naval bombers and the next generation of carrier planes. Once my main objectives are secured, I will use swarms of naval bombers to hold them down while I move my fleets to stage two and take on Australia.
To give myself some more time to buildup, I delay my attack on the US until early 1942. This allows me to form a second strike force of two fleet carriers (Shokaku and Zuikaku, both repeat Soryus as I was unable to scrape together enough XP to design an upgraded carrier).
The first battles are very encouraging. Whenever my patrols find one of his scouting units, my strike fleets sortie and make short work of them, Niall’s vaunted Destroyer swarms being no match for my upgraded cruisers and destroyers. I am somewhat confident that I can attrit his screening forces faster than he can replace them, which would eventually force his fleet to remain in port or eat absurd numbers of torpedoes.

Things quickly turn a little chaotic as my strike fleets and patrols intercept a number of troop convoys. While I first thought that these were going to the Philippines, they instead turn out to be trying to seize islands in the Central Pacific. Things don’t go well for him, as he has decided to keep his battleships and carriers on strike duty instead of covering his invasion convoys. Several divisions are effectively destroyed at sea, and the remains fail to gain any footholds.
At the same time, my invasions in the DEI, supported by the old battleships Ise and Hyuga, have run into stiff opposition while attempting to land in Borneo. I shift some tactical bombers into the theater to help break the stalemate, and we are starting to make progress. The two-pronged assault succeeds in establishing a foothold, but it is a reminder that Niall has not been idle and is ready to fight for every inch of ground in this vital area.

While my marines still struggle to make landfall in the Philippines, a bigger drama unfolds in the Bismarck Sea. Niall has finally unleashed his main strike force, after one of his patrols found my carrier fleet.
The Battle of the Bismarck Sea does not go particularly well for the Imperial Navy. With several battleships detached for minor repairs, the US Navy breaks through my screening units and manages to do an end run on my carriers, sinking all four for no capital ship loses on their side. The survivors straggle home, many ships badly damaged during the ferocious engagement as my battle line attempted to screen against the full might of the US battlefleet.
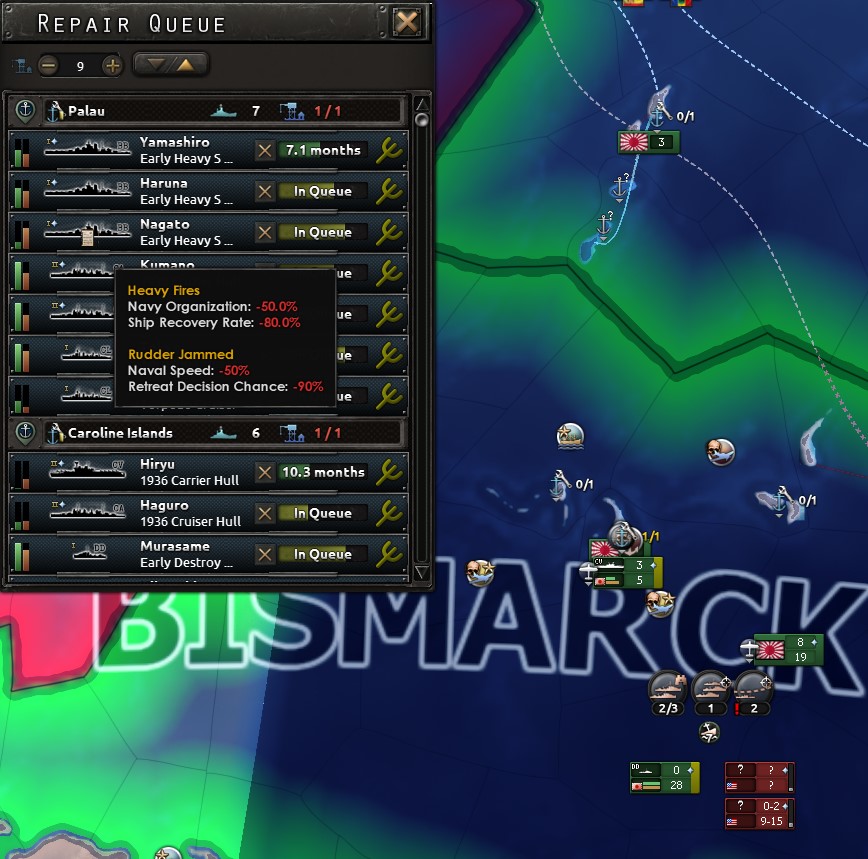
However, Niall’s victory has come at a steep cost. Most of his battlefleet is badly damaged, and he has nothing to follow his success up with. More than that, I still have 6 carriers in reserve (2 fleet, 4 light), and several hundred naval bombers scouring the Bismarck Sea means that he has to risk his battleships again to sail them to safer harbours for repairs. Several of them take further damage as they retreat, many of them out of the battle for almost a year.
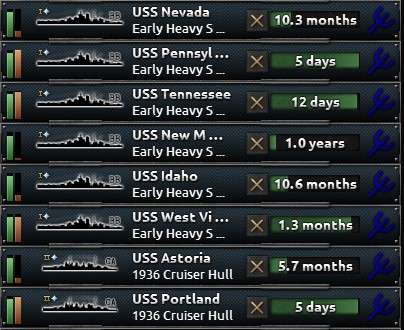
While Niall has blunted my offensive power quite severely, he has nothing to interfere with in my operations in the DEI, which were the main objective. Trying to use the Philippines as an unsinkable aircraft carrier has become next to impossible as trying to supply it with fuel would cost him too many convoys and tank his war support. The Japanese conquest of the southern resource area won’t quite be the lightning strike it was in history, but it is as inevitable as the rising of the sun.

With hindsight, my performance in the naval war thus far comes down to:
That is all for today. Tune in at 1600 CET for another stream with an indepth look at fuel.
This was played as an MP game between me and Niall (@Ceebie), with me defending the Empire of Japan’s honor against Niall’s filthy American imperialists.
Starting as Japan, I immediately face a number of issues that should sound very familiar: I have very limited resources, particularly in terms of oil. This is now a much bigger issue as I can still happily build ships and airplanes and tanks, but I won’t be able to run them for free. However, if I want to upgrade my ships (and knowing Niall, I absolutely do), I will need naval experience, and China is unlikely to provide me with a lot of it. So I need to run training missions for my fleet, which gobbles up fuel at a rapid pace (I could only take out my main fleet units for a few brief weeks before the fuel situation became critical).

At the same time, while I could trade for more oil, it will cost civilian factories which I desperately need to build up my own industry or to trade for steel to continue my military buildup. I decided to keep the trading for oil to a minimum in order to more quickly build up my industry and increase the size of my fleet.

My first target is, of course, China, and we start the war with them in the middle of 1937. It quickly becomes apparent that I underestimate the Chinese. Fighting rages hard along the border for several weeks, and a number of naval landings that attempt to force the AI to draw troops away from the main front are quickly contained by local garrisons, but at least not pushed back into the sea. Part of the problem is that the fleets tasked with invasion support contain some of my battleships, which eat up absurd amounts of fuel, and my attempts to turn the tide through prolific use of air support eat into my fuel supplies even more.
By early 1938, we are slowly grinding forward and have managed to inflict serious casualties on the Chinese, but my fuel stockpile has shrunken to just 30 days of current use. I curtail air support to only support my main thrust and send the naval forces providing shore bombardment back to port. Progress slows, but eventually we link up with the landing forces, at least saving me from an embarrassing early defeat. The massive amounts of Land XP also allow me to run through the doctrine tree quite a bit faster than Niall could ever hope to. Sadly the war in the Pacific will not be fought on land.

It would take until early 1941 for the Chinese to fall, even though the writing is on the wall by the middle of 1940. I blame the poor infrastructure and awful terrain in China - my leadership is, after all, beyond any reasonable doubt.
In the meantime, Niall has been quietly modernizing his fleet and has started his rearmament. While a good amount of his effort is spent on helping out the British in Europe, I have no doubt that he has something in store for me. While I was deeply engaged in managing the war in China, I received some out-of-game intelligence (Niall bragging in the kitchen that his destroyer swarms would annihilate me) that makes me realize that my fleet lacks some key capabilities. The starting Japanese light cruisers are fairly mediocre, most have been built during the 20ies and are not up to the task of winning a firefight against the likes of a Brooklyn Class cruiser with no less than 3 light cruiser battery modules. What I do have is a lot of torpedoes, and I invest a little into researching upgraded torpedoes and better launchers. The Japanese Long Lance national spirit gives me another perk, as it negates the enemy screening to an extend, which means that my torpedoes can hit his capitals even through 100% screening.

So while I was slowly grinding my way across China, I also decided on my buildup strategy:
- No new battleships, since they eat up a lot of fuel and I have enough to cover my carriers. However, I did later decide to build at least one Yamato-class as an insurance against Niall developing modern battleships.
- A force of 4 light carriers. Japan starts with two (Ryujo and returning fan favourite Hosho), with two Zuhio class building. While these only carry 40 planes each, they will be used to provide cover for operations in and around the Dutch East Indies.
- A force of 4 fleet carriers, with another force of 4 joining later. Akagi and Kaga will be joined by 2 more Soryu class carriers and form the main strike force in the Central Pacific.
- A heavy emphasis on air defense and torpedoes. After researching dual purpose main armaments, I design a new destroyer class with improved AA and better torpedo armament. These are joined by a quartet of light torpedo cruisers from the Japanese focus.
- Lots and lots of Naval Bombers to damage the enemy during the approach and pick off stragglers. Once the battle is fought, his damaged ships would likely try and find a close naval base for repairs, so having naval bombers ready to attack them in port would let me finish them off.
- Once I identified the fleet’s weakness in defense against destroyers, I also designed a version of the Mogami Class heavy cruisers dedicated to light gun support. I built another 4 of these.

The fleet’s main objective, however, is to provide support for landings to seize resource rich areas in the Dutch East Indies. To protect the sea lanes to and from these islands, I will need to secure the Philippines, and that is where things get a little dicey.
While I have little doubt that my forces can take over Sumatra, Java and Borneo, Malaya might be a tough nut to crack, and I know that Niall has already started to fortify the Philippines. I have researched amphibious armor well in advance and with China now pacified, I start to turn up production in an attempt to give my marines a bit more punch and hopefully allow me to seize a foothold even against heavy opposition.

Thinking ahead, I also research improved naval bombers and the next generation of carrier planes. Once my main objectives are secured, I will use swarms of naval bombers to hold them down while I move my fleets to stage two and take on Australia.
To give myself some more time to buildup, I delay my attack on the US until early 1942. This allows me to form a second strike force of two fleet carriers (Shokaku and Zuikaku, both repeat Soryus as I was unable to scrape together enough XP to design an upgraded carrier).
The first battles are very encouraging. Whenever my patrols find one of his scouting units, my strike fleets sortie and make short work of them, Niall’s vaunted Destroyer swarms being no match for my upgraded cruisers and destroyers. I am somewhat confident that I can attrit his screening forces faster than he can replace them, which would eventually force his fleet to remain in port or eat absurd numbers of torpedoes.

Things quickly turn a little chaotic as my strike fleets and patrols intercept a number of troop convoys. While I first thought that these were going to the Philippines, they instead turn out to be trying to seize islands in the Central Pacific. Things don’t go well for him, as he has decided to keep his battleships and carriers on strike duty instead of covering his invasion convoys. Several divisions are effectively destroyed at sea, and the remains fail to gain any footholds.
At the same time, my invasions in the DEI, supported by the old battleships Ise and Hyuga, have run into stiff opposition while attempting to land in Borneo. I shift some tactical bombers into the theater to help break the stalemate, and we are starting to make progress. The two-pronged assault succeeds in establishing a foothold, but it is a reminder that Niall has not been idle and is ready to fight for every inch of ground in this vital area.

While my marines still struggle to make landfall in the Philippines, a bigger drama unfolds in the Bismarck Sea. Niall has finally unleashed his main strike force, after one of his patrols found my carrier fleet.
The Battle of the Bismarck Sea does not go particularly well for the Imperial Navy. With several battleships detached for minor repairs, the US Navy breaks through my screening units and manages to do an end run on my carriers, sinking all four for no capital ship loses on their side. The survivors straggle home, many ships badly damaged during the ferocious engagement as my battle line attempted to screen against the full might of the US battlefleet.

However, Niall’s victory has come at a steep cost. Most of his battlefleet is badly damaged, and he has nothing to follow his success up with. More than that, I still have 6 carriers in reserve (2 fleet, 4 light), and several hundred naval bombers scouring the Bismarck Sea means that he has to risk his battleships again to sail them to safer harbours for repairs. Several of them take further damage as they retreat, many of them out of the battle for almost a year.

While Niall has blunted my offensive power quite severely, he has nothing to interfere with in my operations in the DEI, which were the main objective. Trying to use the Philippines as an unsinkable aircraft carrier has become next to impossible as trying to supply it with fuel would cost him too many convoys and tank his war support. The Japanese conquest of the southern resource area won’t quite be the lightning strike it was in history, but it is as inevitable as the rising of the sun.

With hindsight, my performance in the naval war thus far comes down to:
- Lack of radar allowing Niall to get the drop on me in a critical moment
- Lack of training due to fuel concerns
- Insufficient coverage of the seazones with naval bombers failing to disrupt the enemy on the approach
- Not enough screening vessels to protect my carriers against his battle fleet. Although Yamato sunk several ships and survived to fight another day, spending the same amount of 3 heavy cruisers would likely have yielded better results
- Good performance of my light forces when engaged on equal terms
That is all for today. Tune in at 1600 CET for another stream with an indepth look at fuel.
Last edited:

