• We have updated our Community Code of Conduct. Please read through the new rules for the forum that are an integral part of Paradox Interactive’s User Agreement.

GonzaRoh

Recruit
7 Badges
Nov 9, 2017
5
1
  • Cities: Skylines
  • Cities: Skylines - After Dark
  • Cities: Skylines - Snowfall
  • Cities: Skylines - Mass Transit
  • Cities: Skylines - Parklife
  • Cities: Skylines Industries
  • Cities: Skylines - Campus
So, I am messing around with the road editor. Using ModTools I extracted the game's textures and meshes for this 4-lane road (top in the picture) since I am trying to make this 6-lane road (bottom in the picture)

mqcvN8c.jpg


So I took the texture that I extracted and modified it so that it had 3 lanes on each side and a wider median. I also used the apr map as a guide to create the corresponding alpha, pavement and road maps. I did this so that my road blends in perfectly with the game roads. So far so good.

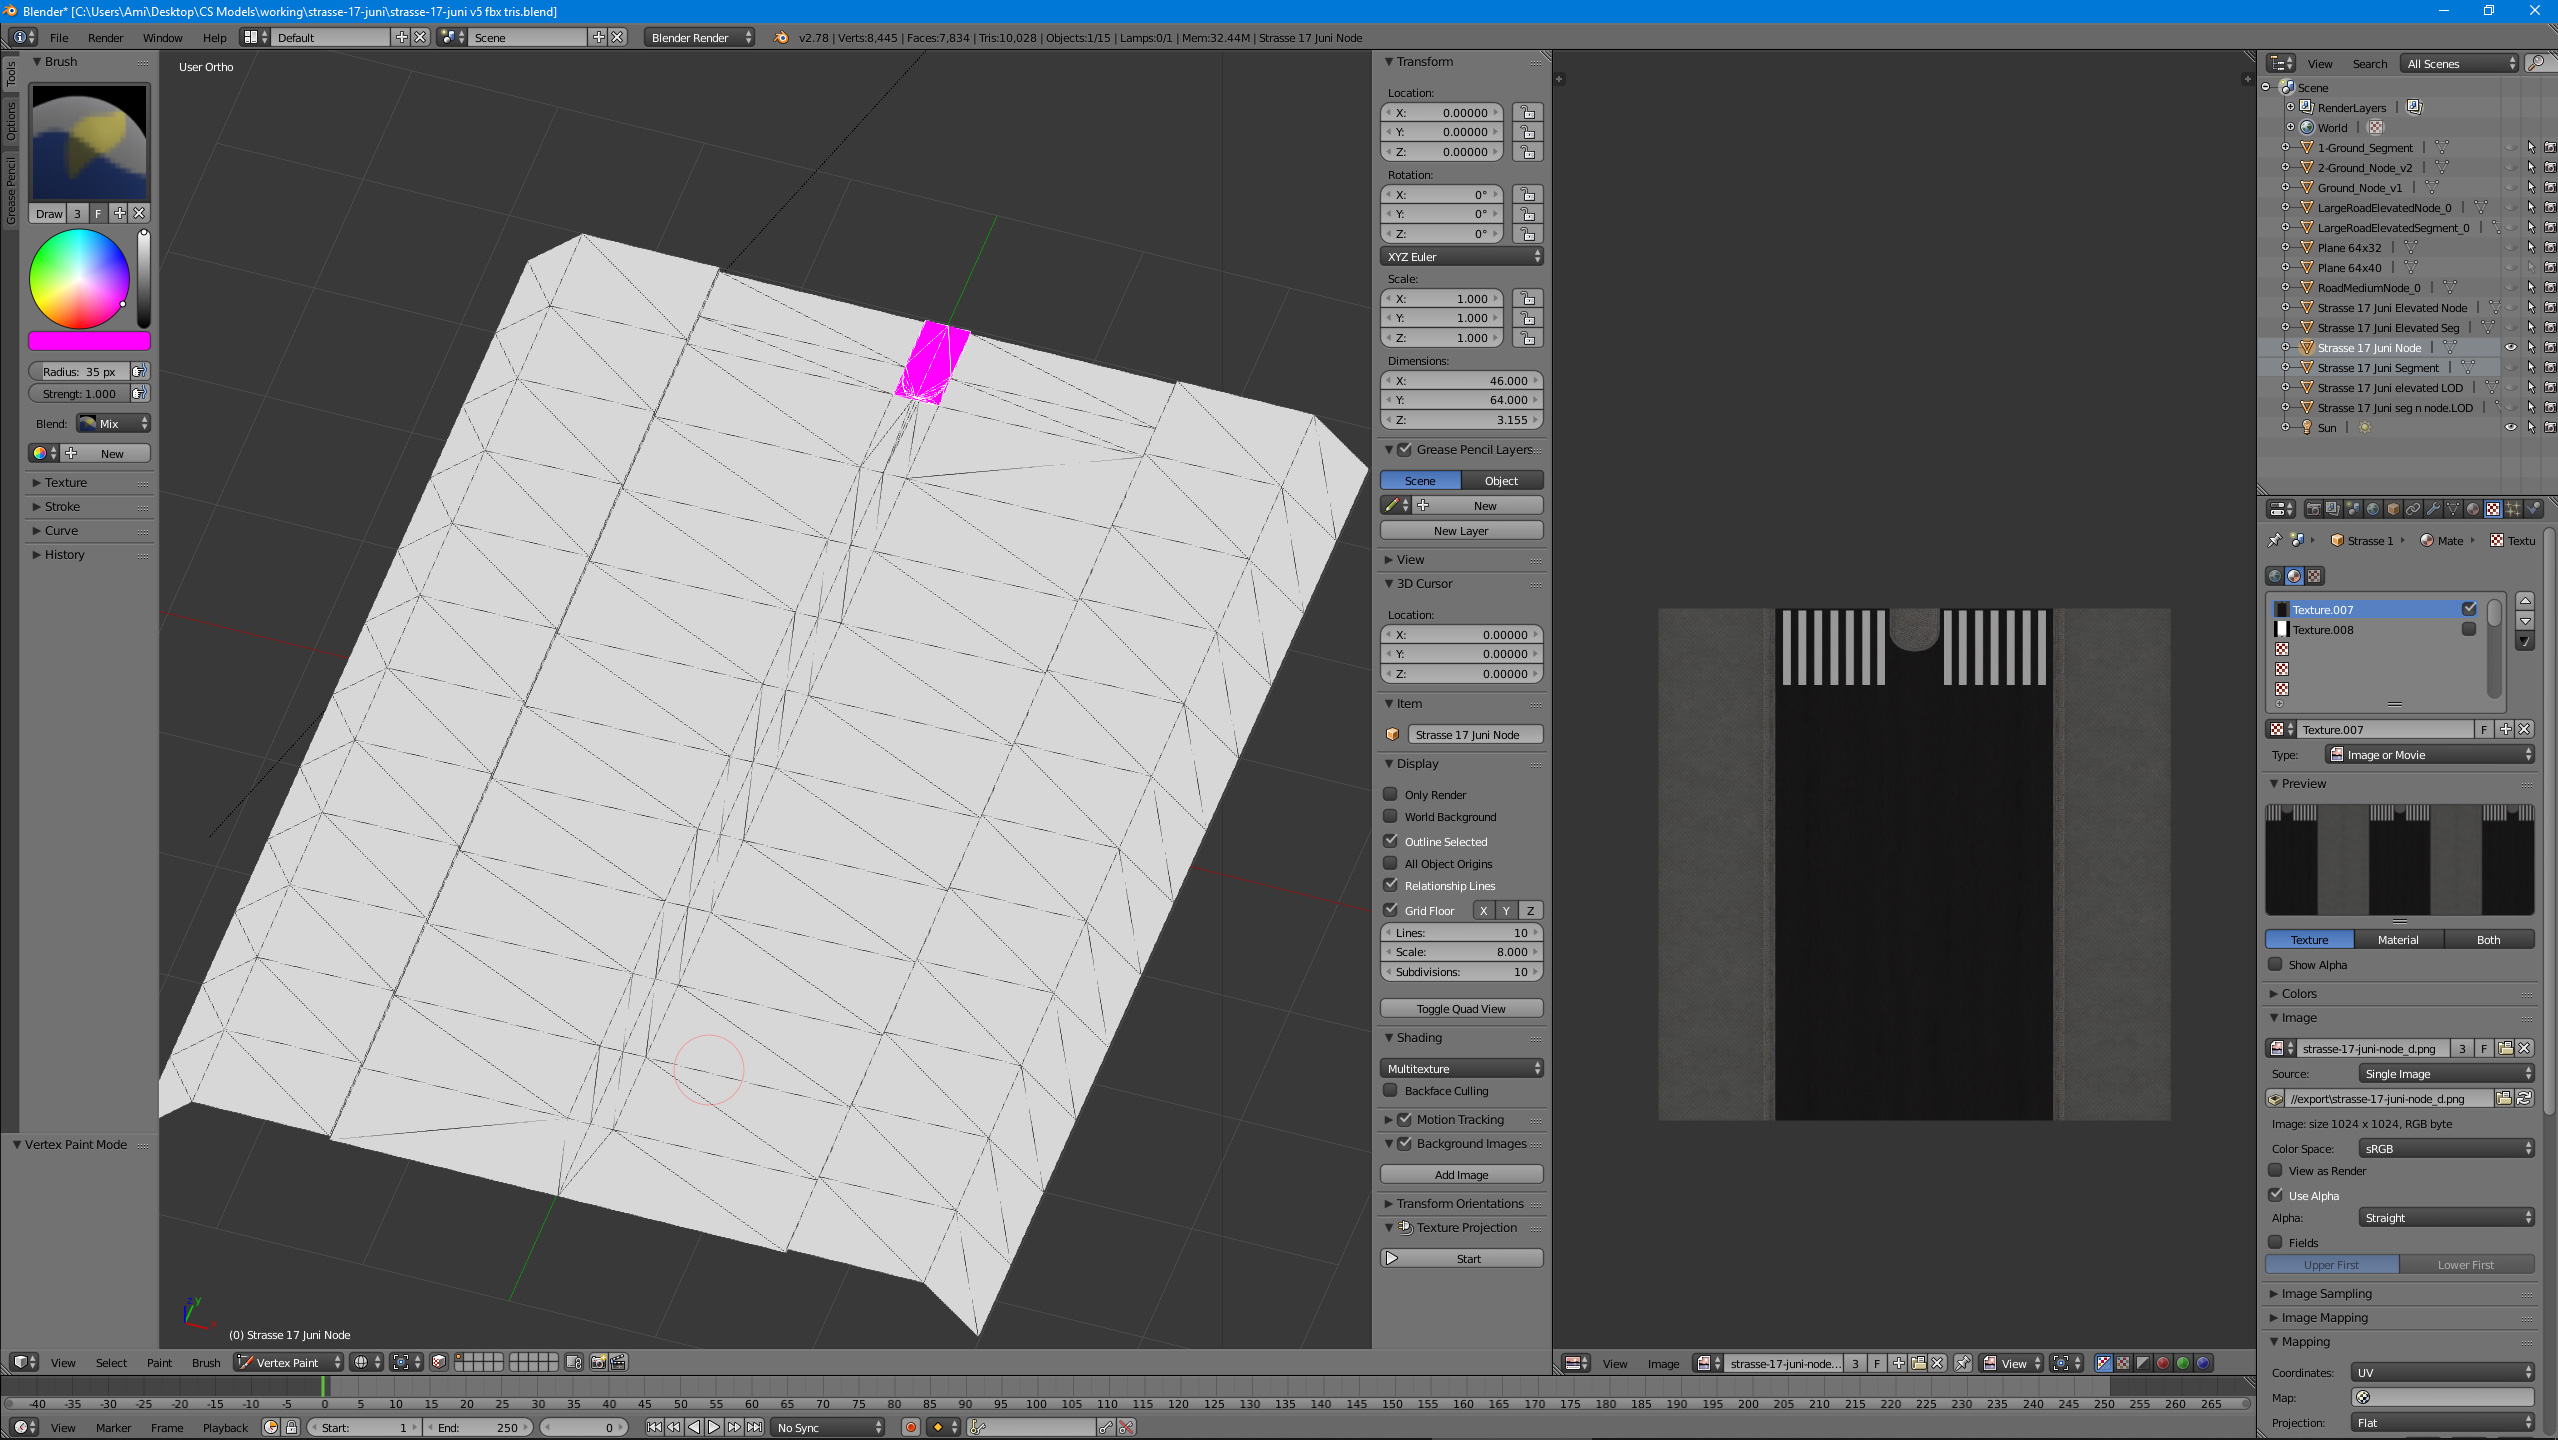
The problem arrived with the nodes. I don't have any blue thingy problems, the sidewalks are fine, the mesh fits perfect with my road segment and any other road. I used the samples I took from the game with ModTools as a guide for the mesh. However, I'm having issues with texturing the median, in the nodes.
sOtNjhX.jpg


Again, I used the apr map as a guide to create the alpha, pavement and road maps. But it doesn't work, It doesn't pick the texture of the median from the diffusion, and it's treating it as part of the road (I know that because when I change the color of the road in the editor it changes there too).
I was so crazy about it that I even took the exact same mesh that I extracted and edited so that it fit my segment. This is how it looks.

shBFMN0.png


These are my PNGs
hEhHmgE.jpg


I know there has to be something wrong with my road and diffusion, but I can't figure out what is it.
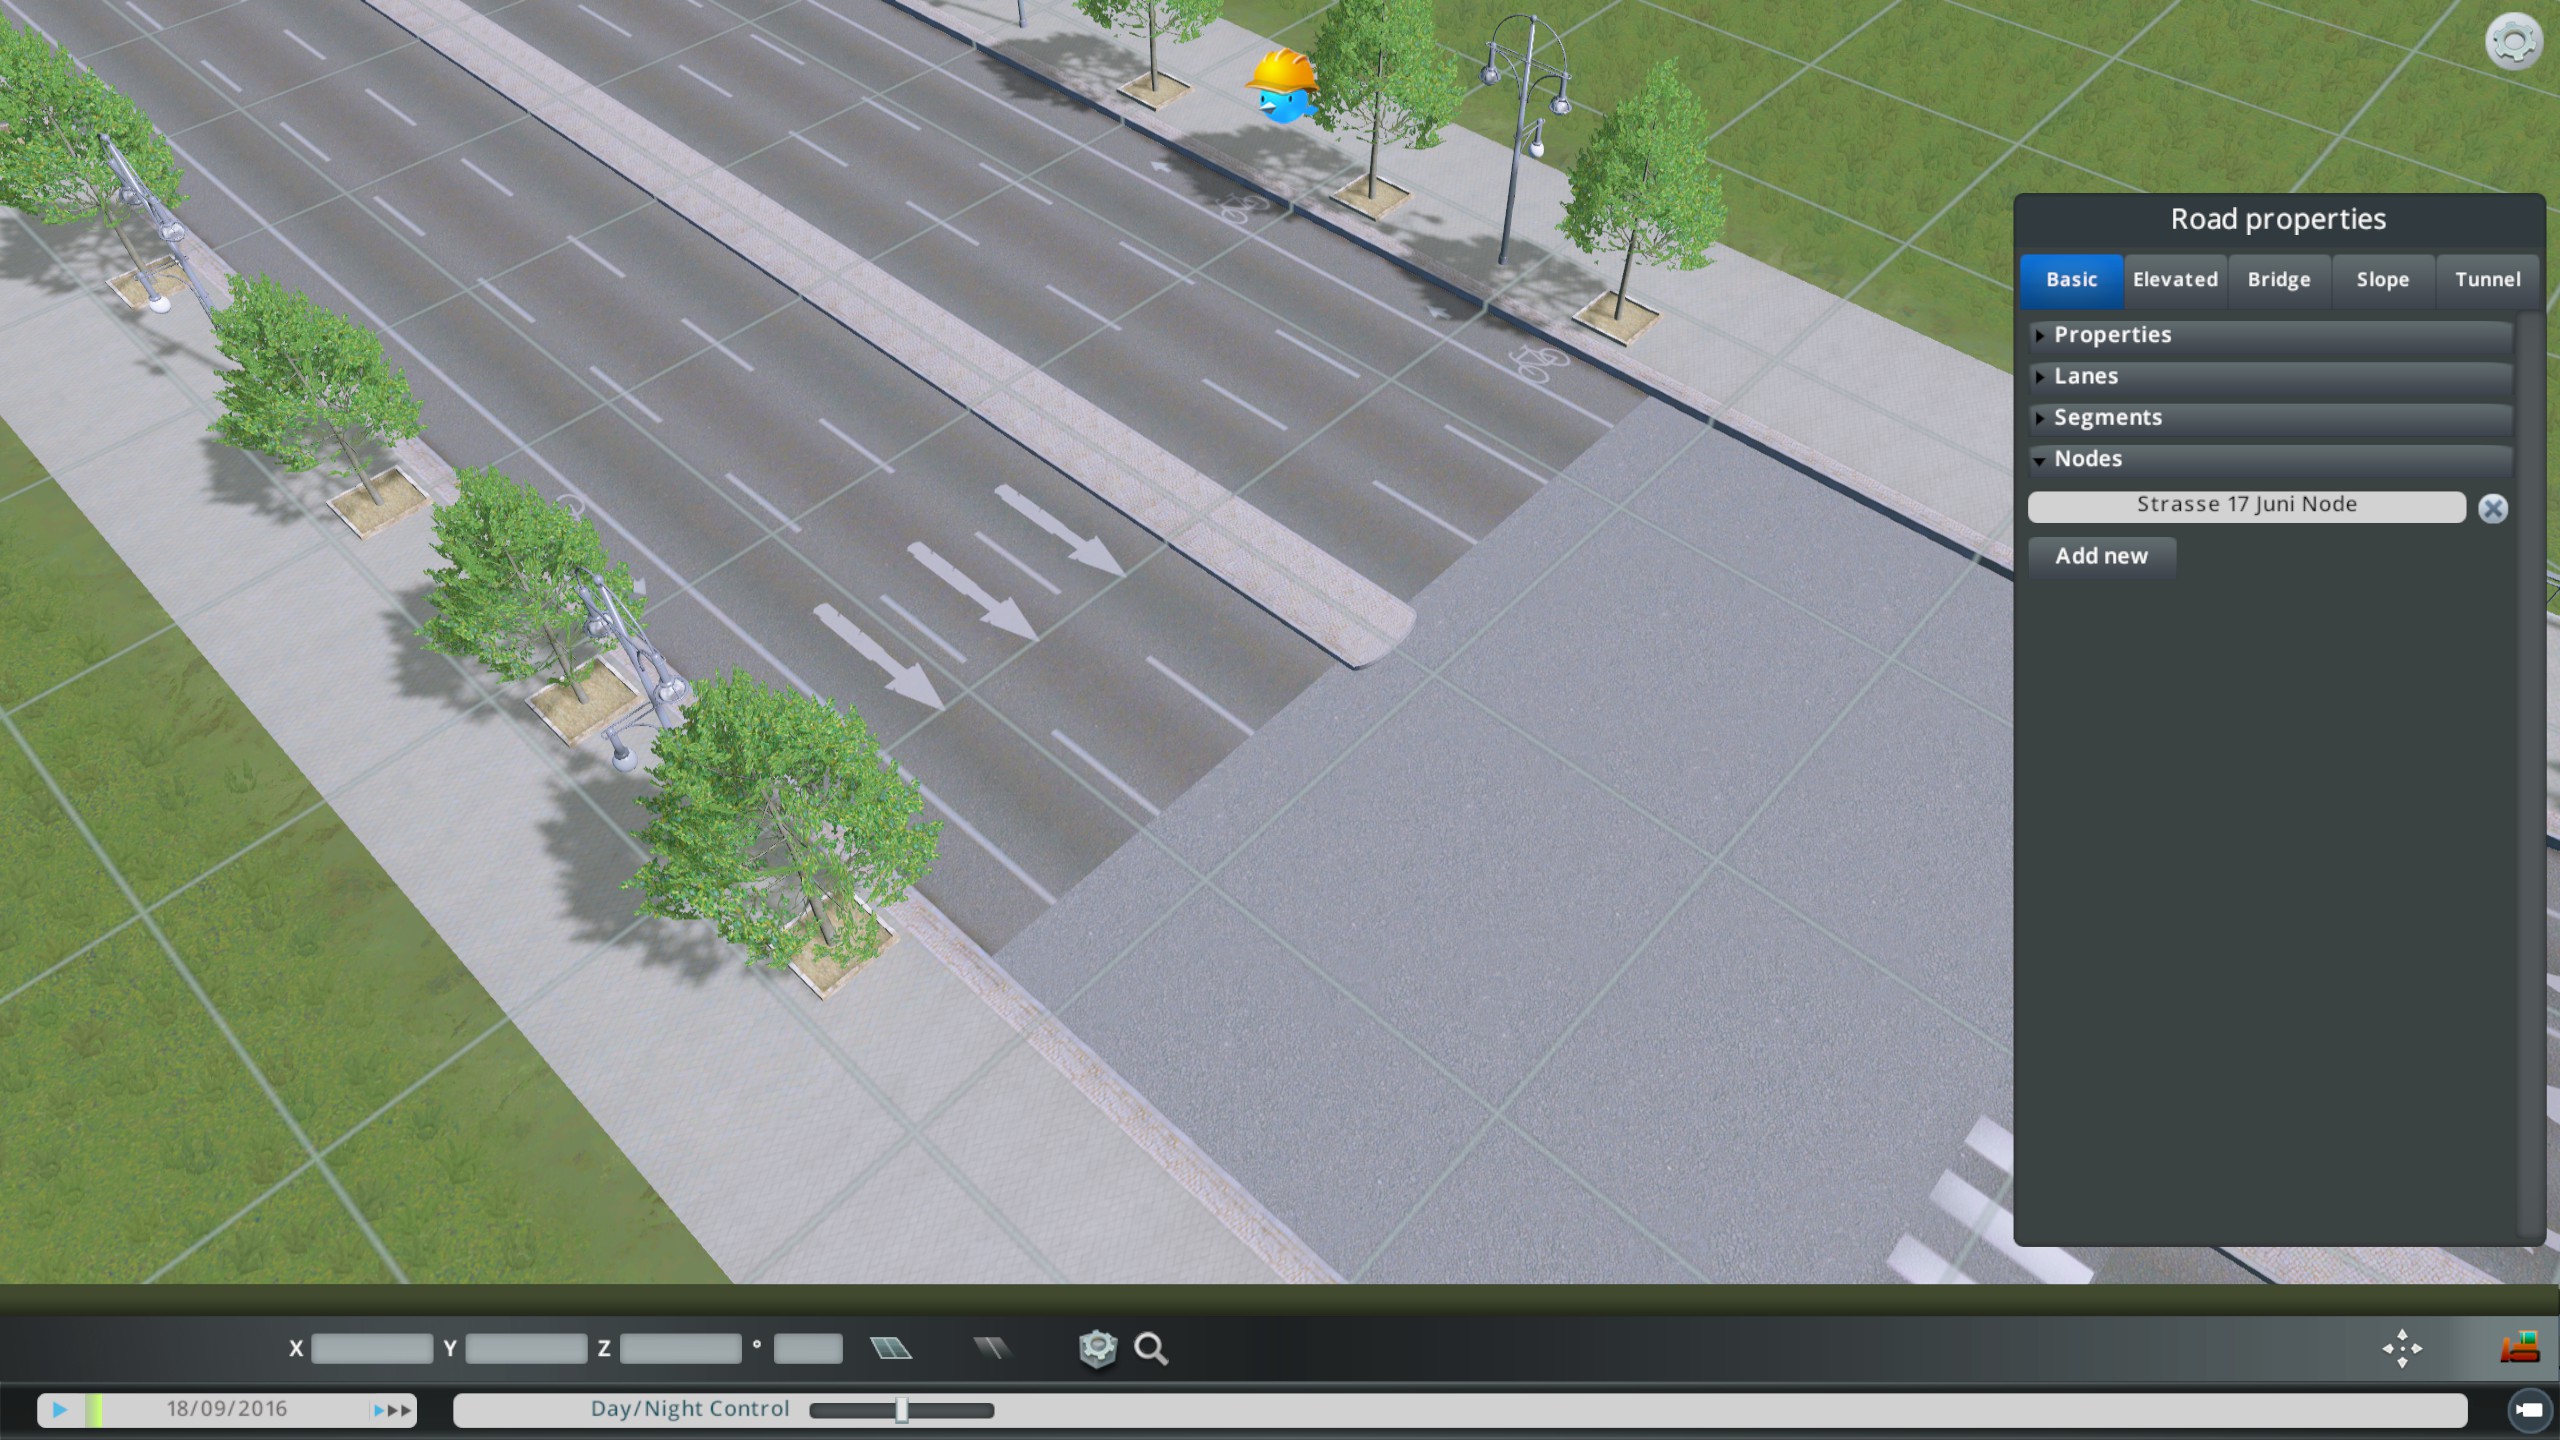
Here you can see how the default 4-lane road median has texture on it. I want that.

Jl2kTOt.jpg
 
Yeah, I read that thread but nothing there seems to help me. It's not marked as pavement because I don't want it to be pavement, I want it to have a texture just like the 4-lane road has.
I really don't know what else to do, I figured how to make the mesh for the node, but I really don't know how to make the road, pavement and diffusion maps for it (only for the nodes, I've done the maps for the segment and they work well).
 
Hi GonzaRoh, I've been messing around with custom road models as well. I've uploaded a custom road to the Steam Workshop - https://steamcommunity.com/sharedfiles/filedetails/?id=1199175553

I have an idea - don't hold me to it though. Node models are still mysterious to me. In your node_r texture, try extending the median black portion all the way down until it's just above where the zebra crossing should be. If that doesn't work, you can try extending the concrete median portion in your node_d texture all the way down until it's just above the zebra crossing as well. For my cobblestone road, I wanted to have a nice transition between asphalt and cobblestone. In my node_d texture, I put my transition just above the zebra crossing (which is all the way at the bottom just like yours) and black for everything above the transition. In my node_r texture, I made everything above the zebra crossing white and only the zebra crossing and transition part black. See the third screenshot in my Workshop upload to see what I mean by the transition - if you look closely there is a thin strip of straight cobblestone between the wavy cobblestone and the asphalt. For debugging purposes, you can try removing your node_r texture to see how things work with just the node_d texture.

Can you tell me how to extract the vanilla roads' meshes and textures using ModTools? I'd be able to make roads that blend in better then. In the ModTools Workshop page, Bloody Penguin commented that ModTools can't extract meshes and textures for roads so I didn't try...
 
Last edited:
Ok so I took your advice and I messed around a whole lot with the _r _d and _p textures with no results. Extending the median black portion in _r just makes a mess with the texture in the middle of the intersection. So I tried flipping the _r map, sending the black notch at the top to the bottom (of course I modified the _d texture too). And although it kind of worked, it wasn't aligned with the mesh, the texture was being stretched and it didn't cover the whole median. Although I didn't find an easy solution, I learned a lot about how nodes work, so thank you for your advice.

Then I remembered something that I read on the wiki about vertex coloring: 'As the mesh is stretched the UV-mappings “scroll” along the V-axis to avoid stretching the texels. Magenta vertex color (255, 0, 255) can be used to disable stretching the UV-mapping for bits where this is undesirable...' So I tried that. First, I returned my textures to their original form, and then, in my node mesh, I turned the median vertices to magenta. And it kind of worked again, but better than before, even though the texture doesn't perfectly align with the median, now it's better.

w95kjzJ.jpg


Can you tell me how to extract the vanilla roads' meshes and textures using ModTools? I'd be able to make roads that blend in better then. In the ModTools Workshop page, Bloody Penguin commented that ModTools can't extract meshes and textures for roads so I didn't try...

So for this, make sure you have ModTools enabled, remember to restart the game when you activate it. The problem is that you have to keep digging, people get to a point where they want to export everything together, that's why they can't, you have to dump the mesh and the textures on its own. I will guide you to one particular mesh and texture so you can see how it's done.

Load up a tropical map or the editor, in there press Ctrl+E it will open a new window. Go to Tropical Collection, Roads, NetCollection (note that Tropical will change depending on the theme you picked). Now on the right side follow this:
+NetInfo[] m_prefabs
+NetInfo[] m_prefabs . [#] pick whatever road you want.
+NetInfo+Node[] m_nodes
+NetInfo+Node m_nodes . [0]
In UnityEngine.Mesh m_mesh press Dump .obj, this will dump only the mesh in your import folder.
Now go to +UnitiEngine.Material m_material and in there you will have two images UnityEngine.Texture2D _MainTex and UnityEngine.Texture2D _APRMap, dump both of them.
For the segment textures and meshes just go to +NetInfo+Segment[] m_segments.
If you don't know already APR map is an alpha, pavement and road map. Yellow represents the alpha map, Cyan the road map and Green the pavement.

Sorry I wasn't able to help you! Perhaps you can try getting help on Simtropolis - all the big guys are there.

Thanks so much for your tutorial on dumping meshes and textures using ModTools!
 
From the center of a node, it is stretched to the sides and the textures are bent as well. Therefore, a node should only consist of the street itself and the pavement, center stripes should not protrude very far into a node, but should be terminated directly after the beginning of the node to avoid unnecessary mesh and texture distortions.

You can find more here, but it is in German and it's from me.
https://www.spielerheim.de/forum/in...s-im-straßen-editor/&postID=138655#post138655
 
Would that be possible to create a node that would display lines on highway transitions between different types of highways? I'm thinking about realistic merging lanes and exits. Maybe even chevron markings?
 
According to my current knowledge of the textures, this is not possible with nodes.

Nodes are bent accordingly and the textures are curved accordingly, I myself deal with various possibilities as far as the segments and nodes are concerned, textures are mirrored in the segments when these curves are also gladly mirrored, so you can't make a continuous line on one side and an interrupted line on the other.

There is still the possibility to work with the Vertex-Color, but it is bound to the mesh points, so you can prevent the so-called texture scrolling, but so far I haven't tested it yet.
 
This thread was very helpful as I too am trying to build a road with medians, and the endcaps of the medians on the nodes are giving me big problems. I can never get them to line up with the texture. Can anybody explain texture scrolling in detail? And vertex painting? Does vertex painting work in this situation? Which vertices do you paint?
 
What 3D software do you use to create your roads?

With Blender you proceed as follows.

Switch to "Vertex-Paint" mode and set the color to the following values

R = 255
G = 000
B = 255

Now overpaint all the dots that concern the center strip with violet (the set color), the object should be white/greyish and the overpainted dots violet/pink.

Make sure that the opacity is set to 100%.

Then export it as FBX file.

My Mother Language is German
Translated with www.DeepL.com/Translator
 
Thanks for the tips Samson. I've never done vertex painting before so I'm kinda lost here. This is what I tried:
vertexpaint.jpg.d8f3e0dd858eeabe85a4c9ec015b2f4c.jpg

Is painting the vertices just around the median part not enough? Do I need to do the entire vertical strip? Also in my workflow I normally use .obj format, is that ok?

My transitions look like this and it's driving me crazy:
20180904162457_1.jpg.c9845349b4b29b4ed93ad041596be362.jpg


Any links that describes this stuff in more detail? I'd like to know what's going on.
 
A tip when doing vertex painting in Blender for CS: At the bottom of the window find the white cube with a side that's red/white checkered and select it. Then in Edit mode you can select all the faces you want affected by the vertex paint and back in Vertex Paint mode they'll be highlighted. Then you just need to hit Shift + K (I think that's it, otherwise you can find it in the Paint menu) to apply the color to all highlighted areas. Makes vertex painting soooo much faster for CS needs. :)
 
Exactly Avanya, you can select the areas or points before in the edit mode, then you switch to the vertex paint mode, activate the said cube with the red/white check pattern.

Simply set Color R to 255, G to 0 and B to 255 and then press the CTRL + K key.

I forgot to mention that.

As for exporting objects, always export in FBX format, so you are on the safe side that all the necessary information is stored with it.

OBJ does not support Vertex-Paint data, so all information about it will be lost.

Sorry, my native language is German and I have the text translated from German to English via DeepL.com.

Translated with www.DeepL.com/Translator
 
Oh my effing .... you guys are awesome.

Those last comments just set me straight. I was exporting .OBJs so ofc none of my vertex painting was doing anything. And that tip about selecting and painting whole faces worked a charm. The paintjob:

omgitworks.jpg


and the result:

20180907002707-1.jpg


stuck like glue! I still need to put the stripes back, but I know now that this is gonna work.
 
I was unhappy with the cobble textures so I re-did them from scratch. I also painted all the vertices on the median, even for the segments. This was the only way I could get my seamless offsets on the texture to line up. Before painting the vertices, the road would just stretch and put seams wherever it wanted. So I'm still fighting this thing and progress is extremely slow. I'm happy with my curbs tho, those were important to me:


Now let's talk about normal maps. These cobbles and curbs would look much better with some normal mapping to give them some semblance of depth. I read that normalmaps are different on roads? Do they work? And what about the spec map? I had the idea to put a light spray of tiny white dots on the spec map to see if I could get the cobblestones to glimmer a bit (an effect of these cut granite stones IRL). Think it's possible? Any tips for the spec and normal maps on roads?