We have updated our Community Code of Conduct. Please read through the new rules for the forum that are an integral part of Paradox Interactive’s User Agreement.
You are using an out of date browser. It may not display this or other websites correctly. You should upgrade or use an alternative browser.
Introduction
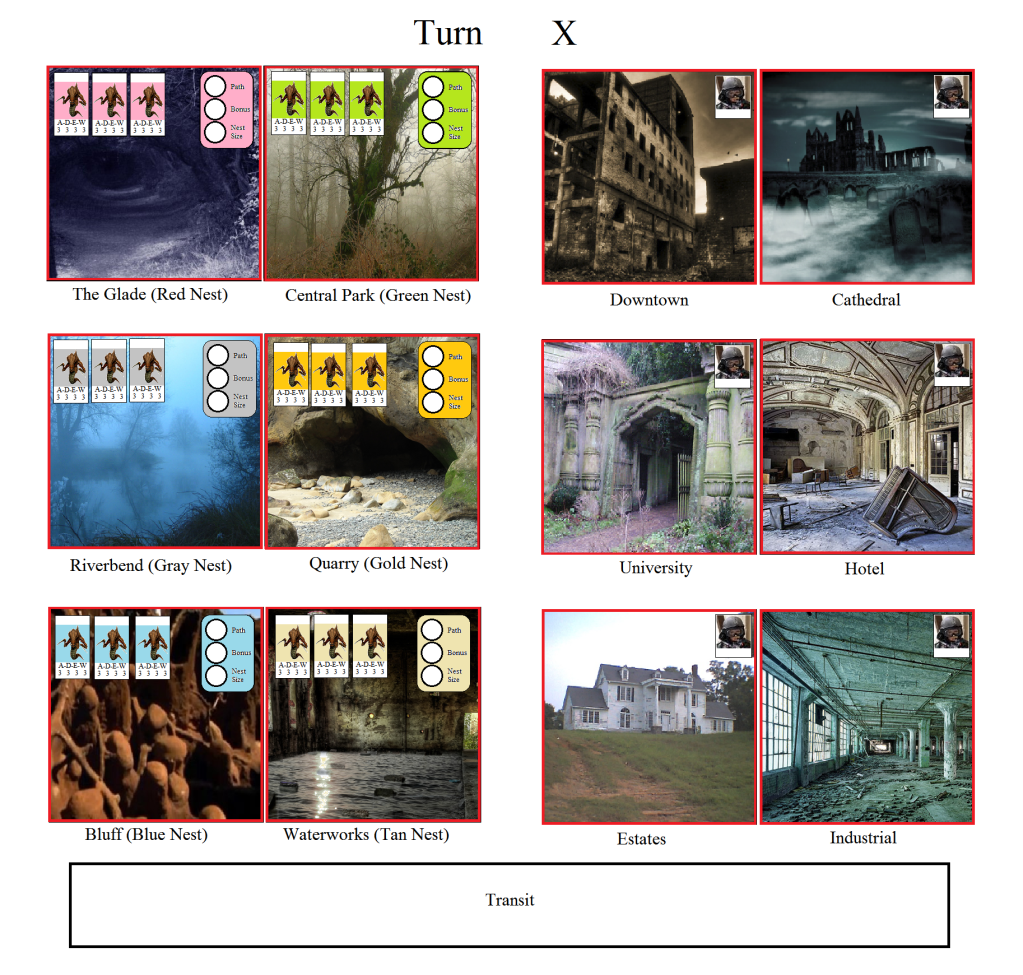
In the spring of 2074, several Hive nests sprouted in the former town of Miller Hollow. Each colony set up in a different part of the urban environs, and for a time all was in harmony for the local Hive. The brood mares communed with each other in assigning culling quotas and husbandry areas, then each guided their respective Hunter packs in harvesting the feral humans for use in strengthening and growing their fledgling colonies.
Alas, peace would not remain for long. Each nests desire for more and more prey to support Hive growth was outstripping their ability to capture humans. Discord between the colonies became the norm, and hunting packs from different nests began attacking each other when in the same area. Conflict grew, until each group realized there could be only one Nest remaining in Miller Hollow.
Miller Hollow Horror is a strategy game for multiple players, set against the backdrop of the Last Earth War (2063-2081), which devastated the planet for a century afterwards and was the primary driver for human expansion to the outer system and beyond.
Each player controls a single Hive colony (Nest), seeking to both increase the size of their Nest and enhance their hunting packs in a race to dominate the region centered on the ruins of Miller Hollow. The players form their Hunters into harvesting groups (Packs) and assign them to Areas for prey culling. If more than one colony has a Pack in a given Area, the Packs fight until at most one remains there. That Pack then trys to capture prey in that area for later use in their Nest.
Once back in the Nest, the colony uses their captives to both molt their hunters into advanced stages of development, or to increase the number of Hunters in the Nest.
At some point, one or more players will send Packs into opposing Nests, attempting to wipe out that competing group.
This process of hunting, Nest expansion and attacks continues until there is at most one Nest remaining.
I. Game Administration.
A. These rules are complete and tested. However, as most mortal projects go, they are subject to error and differing interpretations. The Game Master (the author) reserves the right to make the final decision in all disputes.
B. Should players have any difficulty interpreting these rules, they should post their questions in the forum under this topic. If a player believes that the issue is sensitive, please send the Game Master a private message.
C. The game works in response to player submitted orders.
a). Players must submit their orders to the Game Master (via private message) within 48 hours of notification posted in the forum.
b). The Game Master will process the submitted orders and post the results within six hours after deadline passing.
Players wishing to join the game should notify me by PM, Or you can post your interest in this thread.
Individuals wishing a complete set of game rules should contact me by PM, Or you can post in this thread.
In general, be a gentleman. Treat other players with respect etc.
Don't make things personal!
At the player level there are fifteen rules for the game.
Each rule has a summary section, (unless the rule is really short) which should provide all the information a player needs to know.
For the most part, reading the spoiler contents are for when you have nothing better to do.
With that caveat, feel free to browse. Critique at your leisure.
1.0. Components:
This section just displays the game components. No brain strain.
These rules, a map, rosters, and game counters.
A six sided and one average die.
1.1 The Map:
1.2 Map features:
1.3 Counters
1.4 Rosters and Tables
1.4.1. Avatars
1.4.3. Spare Brigades
1.4.5. Odds Table
Used to find which column to use on the CRT and TAOS chart.
1.4.6. CRT
1.4.7. TAOS Chart
Cross reference the column found on the Odds Table and a d6 roll. Find the leader's Skill level in the intersection and use that guidance.
1.4.8 GM use Icons
1.5. Game Scale
Most turns are one month, and the strength value of a Group is the number of brigades in it.
2.0. Players
Game registration, departure, responsibilities, force assignment, and office holding.
The Presidential office holding and Group assignment parts are a bit detailed.
I will post guidance to these parts in the forum when it comes time to do these activities.
2.0 Players -
2.1. Signing up
Post in the game forum a statement to the effect that you would like to join the game, which side you will join, the name of your Avatar and its attribute levels. You may also add a short (if I have to scroll to read it, it is too long) biography, an image, or other game color item. There is no requirement to do so. The game plays the same whether or not you write something up.
Note that a side may not have more than one player above the number of players on the other side during enrollment. Therefore, if four people sign up to be Federals and two jump in as Confederates, then the last Federal applicant will have to hope another Rebel signs on before the game start.
2.2. Leaving
Please post in the forum is you have to leave the game. You might also want to send a reminder PM to the GM and the people on your side.
The first time a deadline passes and a player does not submit orders, he is considered absent. If the player still has not submitted orders on the following turn, he is struck from the game and the GM assigns that former player’s Groups to the remaining players, with the players with the fewest groups splitting them equally.
2.3. Responsibilities
Post orders on time
Keep informed of pertinent game changes.
2.4. Initial Group Assignment
a. Players list the starting locations for Groups in their nation in order of descending desire to control.
b. For the Union players, they will list twelve locations, the Confederates will note eight.
c. The GM will then assign Groups to players based on those lists.
d. Assignment order
i. The GM will list all of the players’ first choices. If there are no duplicates, then each player will get their choice. If there are duplicates, then the GM will randomly assign that unit to one of the players listing it.
ii. Next the GM will list all of the players’ second choices. The GM will follow the above process where feasible.
iii. However, in the case that the desired Group is already assigned, then the player(s) desiring the
already chosen Group will receive nothing that round.
iv. This process continues until all Groups are assigned.
v. It is possible that some players will receive more units than others.
However, every player will receive at least one Group.
vi. In the event that the GM finishes the list, and one or more players have no Groups, then the GM will select the player with the most Groups (random in case of ties), and assign the lowest priority Group on the losing players list to a player without any Groups. This process continues till all players have at least one Group.
2.5. Office Holders -
2.5.1. President -
The President assigns Activations, replacement brigades, and new Groups to Players.
The President serves at the pleasure of the Players.
At any time, the players may cast a “No Confidence” vote on the President.
If at least half of the players agree, then an election is held for a new president.
Any player receiving at least half the vote becomes the new President.
In case of ties, the GM will randomly select from the tied candidates.
The number of votes each player can cast is equal to their Avatar’s Political attribute value.
The President may assign the activations to whomever he desires, as long as each player receives at least one.
If there aren’t enough activations for all players, then no player may receive more than one.
The same goes for replacement brigades and new Groups.
2.5.1.1 The overall number of Activations for a given turn will be rolled for on one average die (Average Die = 2,3,3,4,4,5).
Die Roll Activation
1 2
2 3
3 3
4 4
5 4
6 5
Note that if possible, each player will receive at least one Activation.
If there are too few Activations for each player to receive one, then the President may allocate Activations to players as he sees fit.
In this case, a player may only receive one Activation.
2.5.2 Group Commanders:
Ideally, Players should only be allowed to command only one Group, but that depends on how many will play.
Players issue orders to their Group(s), specifying what actions to take, whether movement, rally, or dig in.
3.0. Leaders
Leaders manage the movement, combat and other actions of Groups under player control.
There is one leader (avatar) representing the player, and proxy leaders for those Groups owned by the player that are not with the avatar.
Leaders allow for the chance of more unit activities, and influence the actions of the units in engaging and defeating the enemy.
This section also provides the details of how often to check for attribute improvement, generally as it is used.
3.1. Each leader has five attributes: Motivation, Aggression, Initiative, Tactics, and Political. Generally the higher the value, the better for the leader. No attribute may exceed a value of five.
3.2. Avatar Creation
At the start of the game, each player will create an avatar. They have a pool of 25 points to use, and at least one point must be assigned to each attribute. Discard unused points at the end of the creation process.
The values of each attribute are the square root of the points assigned, round fractions down.
3.3. Proxy leaders
Groups controlled by the player that not with the player’s avatar receive a proxy leader. That leader has attributes equal to one half of the player’s avatar (round fractions down), but not below a value of one. The proxy has NO Political attribute though.
3.4. Attribute Effects
3.4.1. Motivational: Chance that unit will remove a Demoralized status from the force without having to use an Activation.
3.4.2. Aggression: Effects Course of Action when near an enemy force. The lower the value, the larger the error in estimating the size of the enemy force, and the more likely that the commander will retreat from the battle or not attack the enemy.
3.4.3. Initiative: Chance of following movement orders without an Activation.
3.4.4. Tactics: Chance that unit will gain a combat die roll shift in its favor.
3.4.5. Political: Votes that leader adds to the controlling player’s voting.
3.5. Attribute Improvement
Avatars may have attribute values change over the course of the game. No attribute may go beyond five. Check only for Avatar Group use, alternates do NOT check.
3.5.1. Motivational: Check for advancement after each use. Roll a d6 and increase the value by one if the result is greater than the current level.
3.5.2. Aggression: Check after each battle. Roll a d6 and increase the value by one if the result is greater than the current level.
3.5.3. Initiative: Check for advancement after each use (Not when Activation used). Roll 1d6, and if result greater than the current level, gain a level.
3.5.4. Tactics: Check after each battle. Roll 1d6, and if both die are greater than the current level, gain a level.
3.5.5. Political: Check at start of each November. Roll a d6 and increase the value by one if the result is greater than the current level. Value may not exceed either the number of players on your side or five, whichever is less.
3.6. Avatar location: Each turn, the player will designate one of his Groups as being led by the player’s Avatar.
4.0. The Map
The game is played on a map of a portion of the United States.
The map consists of zones marking certain locations in the country.
These zones represent important areas and places.
It is on this map that Groups deploy and move from one zone to another.
Groups capture zones by ending the turn on them.
Some zones serve as supply sources.
The more you have, the larger your side is in available forces.
4.1 Zones: Zones are linked to one another by transportation lines representing rivers, roads, and railroads.
Movement will only take place along transportation lines linking the different zones together.
For example, movement is not possible from New Bern to Staunton since there is no transport line between them.
4.1a Supply Zones: The zones that have numbers in the upper left and/or right corners are considered supply zones, which reinforcements can be raised from and supply lines can be determined.
While most zones will only allow recruiting/supply by one side or the other, four zones will allow recruiting/supply by either side (Baltimore, Cairo, Cincinnati, and Louisville).
If the number is in the upper right (grey), it is a friendly Confederate recruiting/supply zone.
If the number is in the upper left (blue), it is a friendly Union recruiting/supply zone.
4.2 The number of friendly supply zones controlled by a side determines the total number of supply sources available for that side.
Supply sources are used to determine the number of Groups that can be in play and a sides recruiting potential during the Muster phase of a turn.
Each supply zone is worth a certain amount of supply for a particular side (see below).
The Union starts with 22 supply zones under their control worth 32 points, with 2 additional zones worth 1 point each that can be captured.
The Confederacy starts with 22 supply zones under their control worth a total of 28 points with an additional 7 zones worth 1 point each that can be captured.
Supply zones can be gained or lost as the campaign progresses.
4.3 Group Size: The number of supply sources available determines the number of Groups a side can have in play at any one time.
Each Group uses three (3) supplies.
4.3a A side does not have to remove Groups in play if they have more Groups in play than supply sources.
That side simply just cannot build new Groups until their army size falls below the total number of supply sources controlled.
4.3b Note that the Union start the campaign with an army size of 36 and the Confederates start with an army size of 24 (twelve and eight Groups respectively each using three supply each).
This means the Union side will not be able to form new Groups until the Union reduces the number of Groups in play so that their army size is sufficiently low enough to form new Groups.
4.3d Removing Groups: The GM will remove Groups from play when all their units have been eliminated or transferred to other Groups.
4.4 Zones on the Map: Each side starts the game in possession of a set number of zones.
Northern zones are blue while Southern zones are grey.
Kentucky starts the game neutral, and its zones are considered to belong to neither side and are marked in yellow.
To capture an enemy or neutral zone, a side must have a Group in the zone at the end of the turn after all battles are resolved.
Groups that simply move through a zone in the course of the turn do not capture the zone.
They must end their turn in a zone for it to be considered captured.
Once captured, mark it as captured and it remains so until an opposing Group ends its turn in that zone and recaptures it.
5.0. Game Length
The campaign starts with the July 1861 turn – as this is when the armies began maneuvering – and continues unit the end of 1865, though it is possible for it to end before this.
Turn 1 - January/February *
Turn 2 - March
Turn 3 - April *
Turn 4 - May
Turn 5 - June *
Turn 6 - July
Turn 7 - August *
Turn 8 - September
Turn 9 - October *
Turn 10 - November/December
* - Union may add a blockade marker to a port Month - Muster
6.0. Victory
For a player to win the game, he must not only have the most victory points of all players on his side, but his side has to win.
Players gain victory points through defeating enemies and capturing supply sources.
The loss of Washington D.C. can have severe consequences for the Federal side.
6.1 Union Victory Conditions: The Union side wins if either one of the following two conditions is accomplish during the game:
6.1a Capture six of the seven Confederate recruiting zones with a value of 2. These zones are Atlanta, Charleston, Mobile, Nashville, New Orleans, Richmond, and Wilmington. When the Union side captures the last of these zones, play ends and the Union side has won the war.
6.1b Prevent the Confederate from achieving their victory conditions.
6.2 Confederate Victory Conditions: The Confederate side wins if either one of the following two conditions is accomplish during the game:
6.2a If at the end of 1865 the Confederates still control of at least two Confederate zones with a point value of 2 or more.
6.2b Hold on to enough supply zones at the end of a turn so that the Confederate total supply sources exceed that of the Union by 6 or more. For example, if the Confederate get 29 points and the Union have 23 points, play ends and the Confederates win the game.
6.3 Tie Game: Any other result is a tie.
6.4 The Fall of Washington:
The Confederate capture of Washington may or may not have ended the war, as its impact on Union public opinion would depend on a number of political factors.
Regardless, it would have a major importance on the outcome of the war, and the safety of the capital was always something that the Union high command needed to worry about.
If the Confederates ever capture Washington, a D6 will be rolled.
The result is the number of supply sources that the Union will permanently lose.
If Washington is recaptured by the Union, the Union will only regain a maximum of 1 point since Washington's supply value is [1/-].
If the Confederates are able to capture Washington a second or even third time, the procedure is repeated.
6.5. Player victory.
Each time a player defeats an enemy force, he gains VP’s equal to the class of the defeated force.
Class (brigades)____VP
Small (1-3)________1
Medium (4-9)______2
Large (10+)_______3
Each time the player captures an enemy supply zone, he gains VP’s equal to the printed supply value of the zone.
7.0. Sequence of Play
The game is played in a series of turns, each of single month turns during March to October, and two-month turns in November-December and January-February.
Each turn consists of four phases.
Phase 1) Order Submissions
Phase 2) Movement
Phase 3) Recovery
Phase 4) Muster – after both sides have finished their turns. March, June, and September turns only.
8.0. Orders
Orders are instructions to the various Groups under a player’s control to take an action. The order types are:
Move, Transfer(troops between Groups), Rally, and Entrench (1863 or later).
Please ensure that each turn you specify which of your Groups has your Avatar.
8.1. Players write orders for the Groups they control. Then they submit those orders to the GM before the next deadline (1900 hours EST on Monday and Friday).
8.1.1. A given Group may receive only one type of order each turn.
8.1.1.1. The types of the orders are:
a. Move - List if the Group has the projected zone path.
Indicate whether the Group will move by rail, river, sea, or road.
They must stay on that type of path for the entire move.
b. Transfer - Move units from one Group to another. The two Groups must start adjacent to each other.
c. Rally - Remove disruption from Group.
d. Entrench - Dig in for better protection from attack. Not usable before Jan. 1863.
8.2 Activations
Only one Activation can be issued to a given Group and only Groups that receive an Activation are certain to move during that phase of the turn.
The Activation ensures that the order is carried out without having to rely on a leader’s Initiative.
8.3. When submitting orders, please indicate which Group your Avatar is with for this turn.
9.0. Movement
The basic unit for the game will be the Group, which is the term used here to represent the troop structure (Corps and Divisions) of the individual units in the zone.
Those units move from zone to zone within limitations.
The biggest limitation is that only ONE group may be in a given zone at the end of the turn.
Road is the slowest (adjacent zone), River is quicker (two zones), and Rail travels the farthest (four zones).
Groups may use rivers and rails ONLY if the entire path is along friendly zones.
Confederates may not use the Potomac river.
Federals may move forces between friendly ports.
The Union may from time to time invade enemy ports.
9.1. One Group per Zone: No more than one Group from the same side may occupy the same zone at the end of the movement phase.
The infrastructure of a zone can only support so many troop formations and movements, and this is easiest way to reflect these limitations during the game.
9.2. Opposing Groups may never pass through one another. A Group must stop moving once it enters a zone containing an opposing Group and battle.
9.3 Moving: An Activation (or successful attribute check in its absence) will allow a Group in a given zone to move to another zone that is connected by one or more roads, rivers, and railroads.
The distance that a Group (G) may move will depend on the transportation line chosen (see Movement Table below).
To utilize the full potential of moving via railroad or river the moving player must control all the zones being moved through and the Group must stay on that transportation line for its entire move.
They cannot switch between lines of transportation.
Movement Specifics - Movement is done during a series of Impulses.
There are four Impulses during movement, and any combat during a specific Impulse is completed before continuing to the next Impulse.
Before moving units in a specific impulse, the GM randomly assigns a sequence number to each moving unit.
No two numbers match, and the movement order is in sequence order, from lowest to highest.
9.3.a Railroads: To use railroad movement, the moving player must control all the zones that are being moved through.
Any railroad line, which runs between zones that is controlled by opposite sides, is treated as a road and no railroad movement is permitted.
9.3.b Rivers: To use river movement, the moving player must control all the zones that are moved through.
Any river line, which runs between zones that is controlled by opposite sides, is treated as a road and no river movement is permitted.
Due to the increasing Union naval transportation and gunboat support, starting in 1863 the Union player may use river movement and disregard which side controls a zone being moved through unless a Confederate Group is in the zone.
The presence of an enemy Group will stop movement.
9.3.c Potomac River Restrictions: Due to the presence of the Union Navy, Confederate Groups may not move along the Potomac between Fredericksburg and Washington DC (the river line is hard to see but it’s there just to the right of Manass.Jn.).
Union Groups may however use the Potomac to move between Washington DC and Fredericksburg.
9.4 Union Naval Movement: The Union may, due to its naval superiority, move Groups from one friendly port to another friendly port.
Ports are marked with anchors on the campaign map. It takes one Activation to move one Group using naval movement.
9.5 Union Naval Invasions: On any turn that the Union rolls a "5" on the Average Die for movement, the Union may launch an invasion of any Confederate port (occupied or empty).
The Union Group used must start the turn in a port owned by the Union at the start of the game and may land at any Confederate port.
Note that Fortress Monroe in VA is considered a Union port.
The move costs one Activation to perform.
The Union player is not required to make a naval invasion when a "5" is rolled, but if declined the ability is lost and it may not be saved for later use.
If the invasion results in the Union Group landing in a zone where a Confederate Group is located, a battle will be fought.
9.6 Transferring Units: Individual brigades from one Group may be transferred to another Group within the following restrictions:
1) Both Groups must be in adjacent zones.
2) Both Groups must have Activations (or successful Initiative attribute checks) issued to them.
3) Neither Group can move – only the brigades are moved from one Group to another.
9.6a A Group cannot have more than sixteen (16) infantry units at any one time during the game.
Note: The GM removes Groups from play when all their units have been eliminated or transferred.
9.6b Transfers take place in Phase Four (4). If the donating unit is attacked before executing the order, the order is cancelled.
10.0. Rally
A Rally order will remove a Demoralization state from a Group.
If as a result of using an Activation, the removal is automatic.
Otherwise, check the Leader’s attribute versus a d6, and if successful, remove the state.
Rally occurs in phase Zero (0), before all other actions.
11.0. Entrench
A player may elect to use an Activation to entrench (build fieldworks) for a Group.
The Group cannot move and uses its Activation to entrench in the zone it currently occupies.
The GM notes an entrenched counter on the Group.
Entrenched counters are lost when the Group moves from the zone.
Union and Confederate Groups may not be entrenched until the start of 1863.
12.0. Combat
The larger side has a better chance to win in a battle.
The higher the Aggression rating of a commander, the better the chance he will move to engage an enemy and fight.
A superior Tactical rating betters your chance of inflicting damage on the enemy.
From the players perspective, combat happens when one side enters a zone with an enemy unit in it.
This happens when the moving unit has orders to enter the zone, and its commander determines that the enemy is small enough to defeat.
Just before the moving unit enters the zone, the defending commander checks to see if the moving force is too big to fight and instead evacuates before battle.
The defenders Initiative determines how likely that force will spot the foe before the battle, and both player’s Aggression determine whether they will attack, defend, or withdraw before battle.
Combat is a large, detailed section of rules, implementing the above guidance.
It is mainly for the GM's use, so that details aren't missed when implementing the above.
12.1. Sighting the Foe.
Follow the sequence:
a. Friendly unit moving into enemy occupied zone, use steps 2-4 below.
b. Enemy unit moving into friendly occupied zone, use steps 1-4 below.
1. Roll d6 versus Initiative.
If result is less than or equal to attribute, continue with this procedure.
Otherwise, skip remainder of section.
2. Estimating enemy size:
a. Roll 2d6 and multiply by (6 - (year - 1860)). This is the percent difference between actual and reported force size. Modify the roll by the following:
o +8 If commander Aggression level 1
o +4 If level 2
o -2 If 3
o -4 If 4
o -8 If 5
b. Roll a die for high or low.
On an even result, increase the reported size of the actual enemy force by the percent difference. On an odd result, decrease the reported size of the actual enemy force by the percent difference. Round all fractions to the smaller value.
Example. The enemy has 12 brigades. Our commander is aggression level 3. The die roll is ‘7’. The result is (7x5 = 35 - 2) = 33%. The second die roll is odd, so our commander believes that the enemy has 8 = (12*(1-.33) brigades.
3. Determine Strategy:
a. Combat Ratio/Differential Determination: Consult the Combat Ratio/Differential Determination Chart and cross-reference the friendly strength with the enemy strength. Use the result as the TAOS Column for resolving the decision. Treat all overrun results as table L, and treat all “-“ results as table A.
b. TAOS use. Roll a d6. Find the column on the table determined above and use the die result row in that column. The numbers in the block are the Aggression skill levels. Use the result that matches the leader skill level.
4. Execute Plan
a. Retreat - If moving, stop before entering next zone.
- If stationary, retreat from current zone before the enemy makes their move.
b. Defend - If moving, stop before entering next zone.
- If stationary, do nothing.
c. Attack - a. If moving, enter the enemy zone.
b. If stationary, move into the zone the enemy wants first, and then the enemy enters the zone. The enemy is the attacker in the subsequent battle.
12.2. Combat Procedure
Combat occurs when a force moves into a zone containing an opposing force. A Demoralized force can never initiate combat, although it must defend if attacked.
12.2.1. Combat Ratio/Differential Determination: If both forces occupy the same zone, then combat is initiated. The moving player is always the attacker, even if the stationary player uses Reaction Movement to initiate combat. Consult the Combat Ratio/Differential Determination Chart and cross-reference the attacker’s strength with the defender’s strength to determine the Combat Results Table Column to be used in resolving the combat.
12.2.2. Combat Results Table Column Shifts: The number of Combat Results Table column shifts that will apply to the combat is determined. The column will be shifted to the right one column if the defending force is already demoralized.
12.2.3. Leader Effects, Tactical and Strategic
The leader with the larger value adds the difference in skill to his die roll.
Strategic is one-half of Tactical, round fractions down. Number of rerolls side allowed.
If the stationary force is entrenched, shift one column to the left.
12.2.4. Both Players Roll a Die: Each player rolls one die and locates his result on the Combat Results Table under the column determined by use of the Combat Ratio/Differential Determination Chart. The moving player locates his result under the “Def” column to determine the damage he has done to the defender (the stationary player). The stationary player does likewise, but locates his result under the “Att” column.
12.2.5. Strategic Reroll procedure:
12.2.5.1. If own die roll is one or two, reroll own die.
12.2.5.2. If own die roll is above two, and enemy is above three, force enemy reroll.
12.2.5.3. Else, pass.
12.2.5.4. The attacker use first reroll.
12.2.6. Combat Results Application: The result depends on the size of the attacking force, which is either Small (1 to 3 brigades), Medium (4 to 9 brigades), or Large (10 or more brigades). The defender does likewise by locating his result under the “Att” column next to his force size.
12.2.7. Demoralization: If the CRT indicates that a force is Demoralized, then place a Demoralization marker on the force. A force that is out of supply when involved in combat is automatically demoralized at the conclusion of the combat, regardless of the outcome of the battle.
12.2.7.1. Effects of Demoralization:
12.2.7.1. 1. A Demoralized force can never enter an enemy-occupied zone which it cannot overrun and thus cannot attack.
12.2.7.1. 2. The CRT is shifted one column to the right if the defender is demoralized. The Demoralized force still receives column shifts for entrenchment, however. The Demoralization shift is subtracted from any entrenchment shift to yield a final shift total.
12.2.7.1. 3. A Demoralized force that is attacked uses a single unmodified die roll to resolve combat.
12.2.7.1. 4. When a Demoralized force is attacked, all the attacker’s Tactical Combat Rating modifications and Re-Roll Options are doubled to a maximum of 6. The attacking force automatically receives a minimum die roll addition of 1 and 1 Re-Roll Option, if he would normally receive none.
12.2.7.1. 5. A Demoralized force that enters the zone of an unDemoralized Friendly force immediately causes that force to become demoralized. Conversely, any force entering a Demoralized force’s zone is automatically demoralized.
12.2.7.1. 6. A Demoralized Force has 1 subtracted from its Reaction die roll.
12.2.7.1. 7. A Demoralized Union force cannot make an amphibious Assault
(although it can be transported).
12.2.7.1. 8. A Demoralized force cannot move into the Reaction Radius of an enemy force.
12.2.7.2. Rally from Demoralization: A force can be rallied only if it is in supply. A player can rally a force with a Rally order.
12.2.8. Retreat Priorities: At the conclusion of a combat, only one force can occupy the combat zone. The second force will be either eliminated or forced to retreat. Retreat is a move of one zone. The results of the combat will determine which side is forced to retreat. Following are the retreat priorities in descending order. If the first priority does not apply, proceed to the second, and so forth. If a result is reached that is applicable, ignore all results following it.
12.2.8. 1. If one side is eliminated, then the opposing side remains in the combat zone; no retreat.
12.2.8. 2. If either side achieves no result, then the attacker must retreat.
12.2.8. 3. If the defender is already Demoralized before the attacker enters his zone, then any additional Demoralization result will cause the defender to retreat.
12.2.8. 4. If the combat Demoralizes one force, but not the other, the Demoralized force must retreat.
12.2.8. 5. If both forces suffer Demoralization or neither suffers Demoralization, but one force loses more brigades, then the side with greater loss must retreat.
12.2.8. 6. If both sides suffer the exact same result, then the attacker must retreat.
12.2.9. Retreat Procedure: If the attacker retreats, he must retreat into the zone from which he entered the defender’s zone. A defending force must retreat into one of the zones adjacent to the combat zone, but not adjacent to the zone from which the attacker entered the combat zone. In other words, the defender must retreat such that there is at least one zone between him and the zone occupied by the attacker before he entered the defender’s zone.
12.2.9.1. A force must remain together when it retreats. The owner cannot split a force into separate forces by retreating into different zones.
12.2.9.2. A force (even if demoralized) can retreat into an enemy-occupied zone only if the enemy in the zone would be overrun. In other words, you cannot retreat into an enemy-occupied zone unless you are able to overrun the enemy.
12.2.9.3. A force cannot retreat into a zone in the Reaction Radius of an enemy Army, unless there is no other zone to enter. A force entering a zone in the Reaction Radius of an Army other than the Army that caused the retreat does not trigger that Army’s Reaction; Army Reaction applies only to the player whose half of the Pulse is not in progress - in this case, the defender.
12.2.9.4. A force that is unable to retreat due to restricted terrain or the presence of enemy forces is eliminated. Leader Loss Checks are made for the defender, but regardless of their result, leaders who survive are placed on the Game-Turn Record Track for the next turn.
12.2.9. 5. Summary of Retreat Priorities: A retreating force must retreat into zones that fulfill priorities in the order given. In the event of more than one choice in zones, priority is towards the friendly capital. A priority can be skipped only if it does not apply to the retreating force:
12.2.9. 5.2. Into a friendly vacant zone.
12.2.9. 5.3. Into a zone in the Reaction Radius of an enemy Army.
12.2.9. 5.4. Into a zone containing an enemy force that the retreating force is capable of overrunning.
12.5 End of Battle: When the battle is finished, the winning side stays in the zone where the battle took place and the defeated side must retreat his forces from the zone to any other adjacent zone that is empty and which is currently controlled by his side, and which was not used by the enemy this turn. The victory also counts for purposes of recruiting for the next recruiting phase for the winning player.
12.5a If there are no empty zones to retreat to, a retreating Group may push another friendly Group out of a zone by forcing it to retreat as well, thereby making room. If the Group being forced to retreat cannot do so, then the original push does not happen.
12.5b If a Group finds itself in a situation where it is unable to retreat, that Group will surrender to the other side.
12.5c Due to the presence of the Union Navy, Union Groups may retreat from one port to another friendly port. Confederate Groups cannot retreat in this fashion.
13.0. Rally
If the Group is demoralized, the GM rolls a d6 against the Motivation value of the Group leader.
If the result is equal to or less than the Attribute level, then remove the Demoralized status from the unit.
14.0. Muster
At the end of the March, June, and September turns, and only after both sides have carried out all battles and recovery as well as reorganizations, a Muster is held.
The Muster exists to raise additional Groups as well as to refit current Groups.
To a large extent, the President decides which player receives new resources
14.1 Recruitment: To recruit new brigades roll one D6 for the side in question. Apply any recruiting modifiers and then cross-reference the die roll with the current number of supply sources that side currently controls to determine how many new brigades are recruited.
Modifiers:
+1 for the Union side (reflects the greater recruitment potential of the North)
-1 for the Confederacy starting in 1862 (reflects the lack of recruitment potential)
-2 for the Confederacy starting in 1863 “
-3 for the Confederacy starting in 1864 “
+1 for Battlefield Victories - The side that has won the most battles during the turn. Example, if the Union had won two battles and the Confederacy had won three battles, a modifier of +1 will be given to the Confederacy.
14.2 Newly raised brigades can be used to form new Groups or they may be added to existing Groups.
14.2a Types and Limits: The limits can never be exceeded when newly raised brigades are added to existing Groups.
14.2b Newly raised brigades may only be added to existing Groups that occupy a friendly supply zone that supplies for their side only (blue/upper-left for Union, grey/upper-right for Confederate). Note that Knoxville (a Confederate zone) can supply Union but not Confederates; Chillicothe (a Union zone) can supply Confederate but not Union; Cairo (a Union zone) can supply both sides.
14.2c New Groups: Each side has an army size that determines the number of Groups a side can place in the field. If the army size is low enough to meet the supply resources than additional, Groups may be raised. Remember, a Group takes 3 Supply. Should there not be enough newly raised brigades to form a new Group, then the units are held in a pool and used to form a Group in a subsequent recruiting phase when enough brigades are available.
14.2d Newly raised Groups may only be placed in a friendly supply zone that supplies for that side only.
14.3 Presidential Actions in the Muster
At the end of a Muster turn, the GM posts the number of new brigades for the side. The President then lists which players get those brigades in his next set of orders. The GM posts that to the players at the end of the following turn, and the selected players post the assignments of their new brigades in their next set of orders.
15.0. Closing Ports
The Union can use their fleet to close Southern ports.
15.1. Blockade: The Union starts the game (April, 1861) with Charleston under blockade, and may add one port every other turn to the blockade list - January-February, April, June, August, and October turns only. (New Orleans, Mobile, Jacksonville, Brunswick, Port Royal, Charleston, Wilmington, New Bern, and Norfolk).
15.2. Effects: During the Replacement phase, roll a die for each blockaded port. If the number is less than the year, a blockaded port produces no supplies, otherwise it produces one-half of its normal supplies, round down. It still serves as a source of supply.
16.0. Supply
Groups must be in supply to avoid attrition.
At the end of a side’s turn, the GM determines which Groups are in supply and which are not.
Generally, a Group that traces a path of friendly zones to two or more friendly Supply zones is in supply.
16.1 Out of Supply: Groups in friendly-owned supply zones are in supply if they can trace a supply line to any other friendly-owned supply zone. Groups not in a supply zone are in supply if they can trace a supply line to any friendly-owned supply zone that is itself in supply. Groups are considered out of supply if they cannot meet these conditions.
16.1a Union Groups in ports or able to trace a supply line to a friendly-owned port are automatically in supply.
16.2 Supply Lines: A supply line may be of any length. It must be traced through only friendly-owned zones along any number of friendly railroads and/or rivers sections, but may only travel a maximum of one (1) road section.
16.3 Attrition: If it is discovered that a Group is out of supply at the end of a side’s turn, the GM will roll one D6 for each pair of brigades in the Group. On a roll of 5 or 6, one of the brigades must be eliminated. Example: A Group has seven brigades. The owning player must group six of them into three pairs and roll a D6 for each pair. If a 5 or 6 are rolled, the GM eliminates one of the brigades in the pair.
16.3a If the Group only has one brigade (minimum two to form a pair), then it is automatically in supply and does not roll for attrition.
17.0. Special
The following special rules come into play at different times during the game, Kentucky Neutrality, Valley Pike.
Of particular importance is the D.C. Fortress rule, which allows defending units in the Federal Capital to ignore retreat results.
17.1 Kentucky Neutrality: At the start of the war, Kentucky declared its neutrality and refused to take sides in the conflict. The result was that neither side was willing to be the first to enter into Kentucky and violate her neutrality and push the Kentuckians to choose sides.
17.1a Whichever side first sends troops into Kentucky (yellow zones on the map), automatically gives to the other side a onetime Recruitment Modifier of +4 for the purpose of computing recruitment during the next Muster phase.
17.2 The Valley Pike: One of the few all weather roads is the Valley Turnpike, which ran from Harpers Ferry to Staunton (down the Shenandoah Valley - Harpers Ferry, Winchester, Strasburg, Ft. Royal, and Staunton). For purposes of supply only, this road is treated as a railroad for both sides. It is not treated as a railroad for purposes of moving Groups.
17.3. Units in D.C. do not have to retreat.
18.0. Setup Sequence
1. Players sign up and list their side and Avatar values.
2. GM closes registration.
3. Players list their Group choices, final Avatar values, and vote for President.
4. GM reveals Group assignments, Presidential office holders, and starting Activation values.
5. (Informally) Presidents assign Activations, players devise plans.
6. Players submit orders; Presidents include their Activation assignments in their orders.
7. GM processes orders, posts results, including next turn Activation value.
19.0. Groups
When forming new Groups, the limits listed below must be followed.
Existing Groups may be expanded by adding new units or by transferring units from one Group to another.
19.1 Union Groups: Starting and newly recruited Union Groups will have eight (8) units.
19.2 Confederate Groups: Starting and newly recruited Confederate Groups will have eight (8) units.
19.3 Initial Union Group locations:
* Army of the Potomac, Washington DC – (McDowell)
* Army of Maryland, Frederick – (Butler)
* Army of the East, Baltimore – (Hunter)
* Army of the Valley, Harper's Ferry – (Patterson)
* Army of Pennsylvania, Pittsburgh – (Heintzelman)
* Army of the Republic, Columbus – (McClellan)
* Army of the Ohio, Cincinnati – (Anderson)
* Army of Indiana, Fort Wayne – (Buell)
* Army of Freedom, Dayton – (Halleck)
* Army of Illinois, Chicago – (Grant)
* Army of the West, Normal – (Pope)
* Army of Missouri, St Louis – (Lyons)
19.4 Initial Confederate Group locations:
* Army of the Valley, Strasburg – (J E Johnston)
* Army of Northern Virginia, Manassas Jn. – (Beauregard)
* Army of the Potomac, Fredericksburg – (Holmes)
* Army of North Carolina, Charleston – (Hardee)
* Army of the Tennessee, Atlanta – (Polk)
* Army of the Gulf, Mobile – (Bragg)
* Army of the Mississippi, New Orleans – (A. S. Johnston)
* Army of the Missouri, Springfield – (Price)
A. Players submit orders, Game Master implements them.
B. Two phases; in the first, the players submit instructions to use their captives to feed, breed, and grow their Hunters. If the Nest has no Captives, then none of the previous applies.
The players also pick which psychic path they will use to aid combat.
C. In the second phase, the players list the Areas where their Hunters will attack; they may also decide to leave a force at the Nest as defense.
Notes from Play testing:
0. The rules are your friend. Knowledge is Power. The only dumb question is the one not asked. In other words, look at the rules and ask the GM if they don’t answer your question. Please.
1. Several Nests ganging up on a given Area doesn’t work well as a team effort. The Hunters will randomly attack any foe, even if the controlling players are trying to work together.
2. A defended Nest can be hard to raid with low odds. I would estimate a Raider needs a three to one numerical advantage to succeed.
3. Hunters staying in Nests, and those attacking other Nests, gain no captives. A Nest needs captives to keep from starving to death.
GAME is interesting, but work has taken me from reliable internet towards the land of unreliable internet. until further notice i am out of everything.
1. Players can learn the essentials of the rules by reading just the light colored type in this section.
2. For those wishing to know the gory specifics of game mechanics, as well as examples and illustrations of the rules, select the links at the start of each rule section.
I. Overview
This section provides a high level view of the game. You saw that in the opening advertisements.
II. Glossary
This link provides definitions to game terms players may not be sure of.
III. Components
Here is a detailed listing of the parts of the game, along with some pretty pictures of what they look like.
IV. Player Sides
The player may join one of the two sides in the game, either the Alliance or the Coalition.
V. Setup
The players post in the forum which side they wish to play on, along with whatever optional rules they want. The GM adds the applicant to the player list.
Once accepted by the GM into the game, players submit a list of the ships of each nation they want to control, along with which Fleet(s) to deploy them in.
Players may deploy Ships only in Fleets belonging to the ship's nation.
Generally, the fewer the ships a player requests, the better the chance of getting them.
VI. Sequence
Each turn starts with the players submitting orders to the GM (48 hour real-time submission window). The GM processes the turn based on those instructions, and posts the results to the forum. That starts another turn.
VII. Orders
Player orders may consist of three parts; listing the units they wish to buy, combat instructions to Fleets they control, and movement of controlled ships between Fleets.
VIII. Purchase
Players include in their requests the ship nationality, quantity, Influence bid, as well as the Fleet destinations for the ships acquired.
IX. Missions
Players controlling one or more Fleets (Fleet Admirals) may issue orders to those fleets, either 'ATTACK', 'DEFEND', 'DEPLOY' or 'MOVE'.
If 'ATTACK', specify the attacking fleet, then pick one or more provinces adjacent to friendly ones as targets.
Select 'DEFEND', indicate the fleet and choose the number of provinces the fleet protects.
To move a fleet to a new staging area, command 'MOVE', list the departing fleet and the destination province.
To transfer ships between fleets, command 'DEPLOY', the fleet losing ships, how many ships, and the gaining fleet.
The closer the target(s) are, the more ships that make it to battle.
The fewer the targets, the more ships available for each one.
X. Basing (MOVE Mission)
Fleet Admirals wishing to redeploy their Fleets to new locations use the MOVE mission, specifying the new friendly province as the Fleet destination.
XI. Combat
The GM determines how many ships from Fleets make it to their targets.
The greater the target range from the fleet, or the number of attacking Flotilla's, usually the fewer ships that arrive.
Those that arrive attack the opposing ships in a series of combat rounds, with each ship hitting an opponent on a d6 result of ‘6’.
The GM removes those hit from the game, checks to see if one or both sides withdraw from the fight, and if ships from both sides remain, conducts another round of combat.
At the end of the fight, the GM announces the victor, awards Glory to deserving players, and updates both the Fleet strengths to reflect losses and any changes to political control of provinces.
XII. Victory
If one side controls 2/3 of the map provinces, that side wins the war.
The player on the winning side with the most Glory is the game victor.
In cases of ties, then of the tied players, the one with the most ships wins.
XIII. Deployments
The GM moves rebasing Fleets to their new locations and updates the Fleet rosters with their newly acquired ships from the Muster Pool.
XIV. Production
The GM adds ships and new Fleets to the Muster pool for each side.
The GM increases each player’s Influence, generally with the player with the lowest Glory receiving the greatest amount of Influence.
The GM removes players missing a turn. New players may join if a side agrees to take them.
XV. Sample Turn. A write up with screen shots of the course of one game turn.
xxxxxxxxxxxxxxxxxxxxxxxxxxxxxxxxxxxxxxxxxxxxxxxxxxxxxxxxxx OPTIONAL RULES xxxxxxxxxxxxxxxxxxxxxxxxxxxxxxxxxxxxxxxxxxxxxxxxxxxxxxxxxxxxxxxxxxxx
1. Pre-War Operations -
Adds two turns to the game before the war breaks out, allowing players to set up the initial locations for their fleets. Replaces GM set initial fleet deployments for player specified ones.
Extends the concept to other national activations, starting player involvement with them on a limited basis before their formal activations.
2. Fan Fiction (Role-playing) -
Each turn players may earn additional Influence by posting stories relating to the game in the forum.
Introduce the concept of discretion being the better part of valor.
Players can now indicate how long they want to risk their forces in a fight before leaving the battlefield.
Add a new line to the player orders: Preservation: XX, where XX is an integer between zero and 100. The larger the value, the sooner the units will leave the battle.
4. Tactics - DOES slow the game down by inserting an additional two day period in the turn sequence.
a. Tactics allow the player to significantly affect the outcome of a battle by outsmarting their player opponents.
b. Add a line to the player’s orders: Tactics: XXXXXX.
c. XXXXXX is either ASSAULT, RECON, ENFILADE (LEFT, RIGHT), REFUSE (LEFT,RIGHT), STAND, or RETROGRADE.
d. The GM compares the tactics of the respective commanders and adjusts the combat accordingly.
a. Players may elect to invest in advancing military technology, gaining advantages over their less developed opponents at the expense of increasing production costs.
b. Add one or more lines to player’s orders: NATION TECH: XXXX, (Plus/Minus One).
c. NATION is one of the active nations on that player's side.
d. XXXX is either Speed, Attack, Defense, or Stealth research fields.
e. (Plus/Minus One)sets whether to increase or decrease the number of research centers in a field).
6. Ship Types - Does not require any other Optional Rules, but will modify some of those if the players select them and this rule.
a. Invoking this rule changes the composition of the initial ships available.
b. Player purchase orders now must specify the TYPE of ship requested in addition to the existing requirements.
c. Ship Summaries.
i. Dreadnaughts (DN) - The battleships of the galaxy, they take a lickin and keep on kicking. DNs’ can take two hits to destroy, and have a hard time not killing a target each combat round.
ii. Carriers (CV) - Mounting swarms of short-range attack craft, and carrying a decent weapons compliment themselves, these ships can bring pain to any opponent. Though their attack craft do not individually do as much damage as actual starships, they can kill their bigger brethren, and after each battle, their carrier replaces any lost fighters at no cost.
iii. Cruisers (CA) - The Orc’s of the galactic navies, they are cheaper than the heavier capital ships, dish out a lot of punishment for their size, and better at long distance travel to battlefields.
iv. Scouts (SC) - Actually misnamed, these Electronic Warfare ships cause havoc far in excess of their numbers. Before a battle, these ships perform as scouts, determining the location, size, and capabilities of the enemy combatants. During the actual fight, these ships work their electrical magic, blunting the targeting systems of the foe while enhancing the ability of friendly units to hit their targets.
Welcome players, to the 24th century and the Star Trek universe!
May you live long and prosper, and your shirts never be red.
Overview
This is a relatively simple (from the players view, anyway) rule set inspired by the board game Federation and Empire (F&E).
A further inspiration for this are Jeff Watts rules posted in the BoardGameGeek forum for F&E.
This variant targets forum gamers and supports rapid turns, a simple player interface, and the capability of cycling players in and out over the course of the game.
The Story So Far...
Despite the best efforts of mundane rulers, politics evolve over the course of Alpha Quadrant history.
Empires rise and fall, and the Illuminati continue behind the scenes.
Working subtly over the millennia to guide the fate of worlds and their sapients, these functionally immortal puppet masters manipulate events covertly to influence the progress of the galaxy towards their individual goals.
While interstellar governments pretend they run the show, the Shadow Lords compete with each other in their unending game* to mold the universe to their own ends.
*It can be considered a game, ‘From a certain point of view...’, as one misguided ancient wit put it.
Wha...?
OK, my part in this little drama is?
In ‘FedEmpLite’, each player assumes the role of a puppeteer, guiding one of the two major galactic factions (either the Coalition or the Alliance) in their struggle for dominance over the other.
As such, each player controls a portion of that faction’s military, spread over the component nations of the group.
While ostensibly working towards a common victory with the other players on their side, each is also competing with their fellow Illuminati in accumulating Glory for their minions.
For the player on the winning side having the most Glory is both the game victor and primed to become the driving force behind the future of the Alpha Quadrant.
Game Highlights
1. Rapid game progress. Each turn is on a 48-hour cycle (real) time, representing a year in the game. As such, the historical 18 year General War plays out in about five real weeks.
2. Quick Response. The GM posts the results of each turn within six hours of turn end, leaving the players plenty of time to plan for the next turn.
3. Simple Player Interface, complex-supporting rule set. Players can spend little time in their turns and still have an enjoyable and effective gaming experience. Or they can delve into detailed social actions with fellow players, exhaustive analysis of play options, strategy permutations, and so forth. Players decide their level of involvement. The GM is the one doing the work behind the scenes, implementing the details of player guidance.
Rule Highlights
1. Players control multiple ships for one of the two sides in the game.
2. The player with the most Glory on the side winning the war wins the game.
3. A side wins the war by controlling two-thirds of all provinces.
4. Players get Glory by commanding winning battles where they kill more ships than they lose.
5. Players command a battle by having more ships in a battle than any other player on their side.
6. Players win battles by being on the side with ships remaining in the province at battle end.
7. Players gain Influence each turn they are in the game. Generally, the less Glory a player has, the more Influence they receive.
8. Players use their Influence to purchase additional ships.
Administration
1. Be nice to the other players in your communications. I will do my level best to help this game do well, and I can use your help in accomplishing that.
2. This is a beta. I have tested the rules as best I can, but as everyone who has ever played a new game knows, some things fall through the cracks or were not anticipated. So bear with me as we work through the issues.
Active - A nation taking part in the war. Most nations begin as neutrals, and become active after a set period.
GM - Game Master. The person running the game, keeping it all flowing.
Commander - The player with the single largest number of ships in an organization.
Fleets - The administrative centers of military organization, they regulate the operations carried out by each
start nation. Each Fleet exists in a separate province on the map.
Flotillas - Temporary administrative groupings of ships belonging to a particular Fleet, they are the organizations
that actually engage in combat operations.
Ships - The war craft of the Galaxy. Each ship belongs to one player or another, and resides under the combat
administration of a particular fleet, picked by the ship’s owner.
Capital - The political center of a nation, coordinates the economy of that nation. Its capture ends the game
for forces of that particular country. The capital of a nation displayed on map.
a. Provinces restrict the location and movement of Fleets, and Flotilla’s.
b. Provinces initially displayed as those under the control of a particular nation, and the uncontrolled remainder.
c. Players can identify a particular province by using the coordinates listed along the map borders. A combination of a letter and a number identifies a unique province on the map.
2. Charts and Tables
a. Fleet Composition - lists the ships in that fleet, along with their owners.
Note that since player Bugwar has the single largest ship contingent, he holds the Admiral's position.
b. National Muster Pool - Holding area for newly produced ships pending assignment to a player.
c. Glory and Influence - Lists the players and their respective levels in those attributes.
d. Activation Schedule - Lists the turn nations activate.
e. Victory Announcement - Summary of Battle.
3. The one form Players use is Orders - Player instructions to the GM for turn actions.
An example of a player’s orders is:
1. Purchase
PURCHASE (FED, 3 ships, 5 Influence, for Fleet A)
PURCHASE (KZIN, 2 ships, 3 Influence, for Fleet C)
2. Missions
ATTACK( HYDR, Fleet A, Targets A7, A9)
DEFEND( KZIN, Fleet E, 3 Provinces)
MOVE( KZIN, B Fleet, G9)
3. Deployments
DEPLOY( FED, From Fleet A, 3 ships, Destination Fleet B)
1. This game consists of two sides, Alliance and Coalition.
2. The Alliance comprises the following nations: Hydran, Kzinti, Gorn and Federation.
3. The Coalition member nations are the Lyran, Klingon and Romulan.
4. Each side’s nations are allied with each other and may freely move through each other’s territory and enter combat together as long as they are active in the war.
5. Keep in mind though, that players may not deploy ships of different nationalities to the same Fleet. There are no ‘Joint Commands’.
V. Setup
1. Players list which side they will play and what if any optional rules they want.
a. A player may only join a side with fewer or equal numbers of members as the other side.
b. Starting registration closes two days after the GM accepts the first two players.
c. The game uses an optional rule ONLY if ALL the players agree to it at the time of proposal.
2. Once accepted, the starting players PM the GM with the number of ships of each nation on their side they wish to control.
a. The Kzinti (Alliance) have 64 ships in their pool, the Lyran’s (Coalition) have 94, and the Klingons (Coalition) have 146. Note that the Klingons do not activate until turn two.
b. The players asking for the fewest number within a nation have their requests fulfilled first.
c. In the event that multiple players request the same number of ships and there are not enough remaining to fulfill the request, the GM will equitably fill the requests from the remaining ships.
d. If there are ships remaining after fulfilling all bids, the excess goes to the Muster Pool.
3. Deployment - Players submit (via PM to the GM) the starting Fleet locations for their units.
4. The GM assigns ten Influence and one Glory to each player.
5. Examples of Player Game Application Submission Messages:
a. I want to join the Coalition. NO optional rules.
b. I want to join whichever side is available. Use optional rules Tactics, Leaders.
6. Example of Player Bid for Ships:
Ship Bid
Player: Bugwar (Coalition)
DEPLOY( LYR, From Pool, 3 ships, Destination Fleet B)
DEPLOY( LYR, From Pool, 8 ships, Destination Fleet C)
DEPLOY( LYR, From Pool, 13 ships, Destination Fleet D)
DEPLOY( KNG, From Pool, 50 ships, Destination Fleet B)
a. Combat
b. Victory
c. Deployments
d. Production
VII. Orders
1. Players write instructions for the actions they want the GM to execute during the remainder of the turn.
2. These orders should specify how many of the ships in the Muster Pool they wish to acquire, as well as what missions they want the Fleets they control to engage in.
3. Finally, the players indicate any redeployment of ships they control between fleets, or the rebasing of Fleets themselves.
4. Players may find details on Purchase, Missions, and Deployments in their own sections of the rules.
An example of a player’s orders are:
1. Purchases
PURCHASE (FED, 3 , 5, A)
PURCHASE ( KZIN, 2, 3, C)
For readability, the players may wish to write instead of the above:
PURCHASE (FED, 3 ships, 5 Influence, for Fleet A)
PURCHASE (KZIN, 2 ships, 3 Influence, for Fleet C)
2. Missions
ATTACK( HYDR, A, A7,A9)
or ATTACK( HYDR, Fleet A, Targets A7, A9)
ATTACK( HYDR, C, B3)
DEFEND( KZIN, E, 3)
or DEFEND( KZIN, Fleet E, 3 Provinces)
MOVE( KZIN, B, G9)
or MOVE( KZIN, B Fleet, Destination G9)
3. Ship Deployments
DEPLOY( FED, A, 3, B)
or DEPLOY( FED, From Fleet A, 3 ships, Destination Fleet B)
1. Players may submit a PM to the GM listing the ships in the Muster Pool they wish to acquire.
a. When making the list, players will specify by ship nationality, the quantity and Influence bid amounts, as well as the Fleet destinations for the ships acquired.
b. Ships may only go to fleets of their respective nations.
c. Bids must be in whole number amounts, whose total is not more than the amount of Influence the player has.
d. Players may bid for new Fleets. List the Influence amount bid and the starting location for the Fleet.
2. Each list has a Bid Price Per Ship (BPPS). That value results from dividing the bid price by the number of ships ordered.
3. The GM assigns the highest BPPS orders before lower bids.
4. In the event that there are not enough ships to fulfill an order, the player receives those available.
5. In the event that tied bids do not have sufficient ships, the GM will equitably divide the available ones among the tied bids.
6. When assigning ships on an order, the GM deducts the bid amount of Influence from the player’s balance.
7. No deficit spending.
8. Players may not bid for units from a nation that has no capital.
9. The turn before a nation activates, the GM places that nation’s initial OB in the Muster Pool, and makes the starting Fleet deployments for that nation. The players may purchase those new units as part of the normal purchase procedure.
An example of a player bid is:
Purchases
PURCHASE (FED, 3 , 5, A)
PURCHASE ( KZIN, 2, 3, C)
For readability, the players may wish to write instead of the above:
PURCHASE (FED, 3 ships, 5 Influence, for Fleet A)
PURCHASE (KZIN, 2 ships, 3 Influence, for Fleet C)
1. Players conduct offensive and defensive military operations through the ‘Mission’ mechanic.
a. Players controlling Fleets assign them either an ‘ATTACK’, ‘DEFEND’ or a ‘REBASE’ mission. Only one mission per Fleet per turn.
b. The GM then dispatches Flotillas from those Fleets in support of the first two mission types.
c. The ‘REBASE’ mission has its own rule section.
2. Fleet Admiral (Fleet Controller).
a. The player with the largest number of ships assigned to a Fleet controls that Fleet (becomes the Fleet Admiral).
b. Only the Fleet Admiral may assign missions to a Fleet.
c. In the event of ties, the GM selects a random player from among the tied individuals.
3. ATTACK Missions.
a. Format is ATTACK (Primary Target Province, Secondary Target Province, etc.)
b. The Fleet Admiral lists the target uncontrolled or active enemy provinces.
c. Those provinces must be both within range of that Fleet and adjacent to a friendly controlled province. Note: Players may NOT target provinces adjacent to inactive nations.
d. The GM creates a Flotilla of ships from the Fleet for each target.
e. The GM assigns (to the extent possible) equal numbers of ships from the Fleet to each Flotilla.
f. If more than one player has ships in a particular Fleet, the GM cycles through those players, assigning one ship at a time to each Flotilla, skipping players that have exhausted their available Fleet ships. The assignment order is in Attack target list precedence.
4. DEFEND Missions.
a. The Fleet Admiral notes on the Mission order: DEFEND (number of provinces to protect).
b. The Fleet defends the closest friendly provinces under attack that are within range of that Fleet and within the Defend value.
c. The GM uses a similar procedure to the Attack mission in allocating ships to the Flotillas sent to defend the provinces.
d. If a fleet receives no mission, it defaults to the DEFEND (1) mission.
5. Fleet Range. Each Flotilla can move up to six provinces travelling exclusively in a vertical or horizontal direction, less if they move diagonally.
a. Each Fleet Flotilla has a 42 movement point allowance they can use in reaching their targets.
b. Moving from one province to the adjacent one along a flat border costs 7 movement points.
c. Moving across a corner costs 10 movement points.
d. Flotillas may not enter a province without sufficient remaining movement points.
The following is an illustration of the costs of some of the possible different movement paths:
1. Each Fleet operates out of a particular province, signified by a Fleet symbol and identifier on the game map.
2. No two Fleets share the same province.
3. Fleets may only base in friendly provinces that can trace a contiguous path of controlled provinces between the Fleet and the national capital.
4. Fleets unable to trace such a path will select the ‘MOVE’ mission.
5. Move Mission.
a. The Fleet Admiral notes the Mission Order as MOVE, and designates a valid province as the target.
b. During the Execution phase, the GM moves the Fleet icon on the map to the new location.
As an example of the REBASE order:
MOVE( KZIN, B, G9)
a. For each Attack Flotilla, reduce the number of ships in it for range attrition. If no ships remain in the Flotilla, remove it from play.
In other words, when the GM sends a Flotilla to a distant target, some of the ships may not make it there.
In general, the greater the distance, the fewer ships that arrive.
b. For each Defense Fleet, create needed Flotillas and reduce size for each due to range attenuation.
If no ships remain in the Flotilla, remove it from play.
The GM in effect sends Flotillas from each DEFENSE Fleet to the closest attacked provinces (within the quantity specified) the Fleet can reach.
Some of those defending ships might not make it to battle.
c. For each province with opposing forces, the GM groups all Flotillas present into their respective sides.
Multiple players from multiple nations may have Flotillas present in a battle, both on attack and defense.
The GM gathers all the attackers into one group, and the defenders into another.
d. In the event of only allied nations attacking the same uncontrolled province, none take control. All abort.
2. Combat.
a. For each province with opposing forces in them, the GM conducts rounds of Combat until there are no opposing forces in the province.
b. The GM rolls a number of dice for each side equal to the number of ships present. The GM removes an enemy ship for each result of a ‘six’. The GM selects the ships to remove at random.
c. For each side, the GM divides the number of lost ships on a side by the starting numbers of that side. If a percentile die roll is greater than the result, that side leaves the province.
d. If there are ships from both sides remaining in the province, the GM returns to step a.
e. The GM updates the Glory status for the winning Task Force Commanders and Fleet Admirals.
f. The GM updates the OB for each Fleet, reflecting losses. The GM retreats Fleets no longer in friendly territory to the nearest controlled province in the direction of the capital.
g. The GM sets the province control to that of the winning side. If neither side won, control does not change.
h. At the end of all combat, the GM marks provinces unable to trace a contiguous path of friendly controlled provinces between them and their national capital as uncontrolled.
3. Range Attrition.
a. For each flotilla assigned to a battle, divide that flotilla’s total movement used by seven, rounding fractions up. Add the number of ATTACK order Flotilla's making sorties from that fleet. This is the Attrition Trigger.
The further ships have to travel, the greater the chance of mechanical breakdown, or supply ship ambushes. In addition, the greater the number of attacks a fleet commits to, the greater the confusion in communication coordinating the assaults.
b. For each ship in that flotilla, if a die roll is equal to, or greater than the Attrition Trigger, that ship makes it to the destination.
c. For each ship that does not make it, roll a die. On a ‘one’ result (extensive dry-dock level repair needed), remove that ship from the owner’s control and place it in the Muster Pool.
4. Glory Awards -
a. The player starting a battle with the most ships on a side (the Task Force Commander) and wins that battle gains Glory equal to the number of enemy ships that side destroyed minus friendly ships lost in that battle, with a minimum award of one Glory.
b. The Fleet admiral receives one Glory for each Task Force on the winning side of a battle.
5. Loss of the Capital - If a nation does not control their capital, the GM rolls a die each turn. On a ‘one’, the GM removes all ships and fleets of that nation from the game.


")


